Faerie Fragments Game Guide
Welcome to my FF guide! Whether you are playing just for fun or to earn NeoPass rewards, I hope you will find it helpful. Happy matching!
This is a mirror of my guide that can be found directly on Neopets at /~Aremik! At the moment, there is no difference between the two pages... except this one doesn't require you to be logged in! We'll see where things go from here...
Page News
1/26/2026 - A small but important update... I have switched to a new image host! Images should no longer be blocked for UK users.
1/6/2026 - I've added some additional info to the Endless section, summarized a 4th run's difficulty data, and tweaked a few things. Probably my next big update will involve converting to a new image host so UK users can view the images again. Stay tuned!
Questions and Updates
Got questions? I have a board in the FF Neoboard where you can easily contact me about any Faerie Fragments questions, whether or not it's included in the guide! I post daily Tower levels as well as updates on current app events. Additionally, Discord is a great place to keep up with the mobile apps.
What This Guide Is Not
Currently I'm not covering any content relating to the main storyline, side story levels, or cosmetic features like the closet. I might cover some of that stuff eventually, but this guide is mainly focused on completing the main match 3 levels and earning level rewards like NeoPass items and the Matchmaker avatar. Currently there are only a few ways to earn NeoPass rewards: through the daily login calendar (Daily Stamp Card - repeats every two weeks), completing achievements, completing tier 1 of the Tower (only 3k NP), and participating in monthly events (3,000 bronze coin milestone, bronze coin prize shop, and possibly leaderboard competitions). Of course, there are also NeoPass quests on Neopets itself.
Guide Navigation
Neopian Times Articles
More coming soon!
Quick Level Links
Tip: change the URL to match the level you need.
Level Overview
Level Number ☆☆☆☆☆
Spawning Neopets
#1
#2
#3
WxH
Wind
Moves
This first "level" is a sample to show how to read the guide. Each level has 1-3 objectives you need to clear. Additional info is the width x height of the board itself, the direction of flow (Wind), and a set number of moves available.
The stars next to the level number indicate my personal difficulty ranking. It ranges from 0/5 to 5/5 stars, with 5 as the hardest difficulty.
Some levels have specific notes or tips - especially 5/5 star levels. Some levels will have additional screenshots. The "↺" button will reset to the default screenshot. The "★ Map" button will show the location of Constellations.
1 ☆☆☆☆☆
6
5
8x6
↓
20
2 ☆☆☆☆☆
20
20
8x7
↓
20
3 ☆☆☆☆☆
4
9x9
↓
20
4 ☆☆☆☆☆
25
25
9x8
↓
25
5 ☆☆☆☆☆
20
20
9x9
↓
20
6 ☆☆☆☆☆
42
9x8
↓
22
7 ☆☆☆☆☆
54
9x9
↓
20
8 ☆☆☆☆☆
44
9x9
↓
20
13 ☆☆☆☆☆
3
8x8
↓
20
15 ★☆☆☆☆
42
6
10x9
↓
16
20 ☆☆☆☆☆
9x5
↓
10
Fun fact: this is the only level in the game that does not have Neopet tiles.
21 ✯☆☆☆☆
120
8x8
↓
10
22 ★☆☆☆☆
140
3
10x9
↓
16
↺★ Map
New screenshot and star map coming soon - this level has changed since I established the guide.
23 ★☆☆☆☆
6
260
9x9
↓
18
25 ★✯☆☆☆
120
2
37
11x9
↓
20
30 ★✯☆☆☆
25
200
8
11x9
↓
22
Tower 25-200-8
31 ★☆☆☆☆
66
9x9
↓
16
33 ★✯☆☆☆
15
60
11x9
↓
14
Tower 15-60
34 ★✯☆☆☆
50
150
10x9
↓
14
Tower 50-150
36 ★✯☆☆☆
32
4
126
9x9
↓
16
Tower 32-4-126
38 ★✯☆☆☆
4
4
36
9x9
↓
20
↺★ Map
You can make a Nova by swiping the yellow tile between the Paintings up, then making a match 5.
Tower 4-4-36
39 ★✯✯☆☆
48
48
80
10x9
↓
22
Tower 48-48-80
40 ☆☆☆☆☆
9x9
↓
11
41 ★☆☆☆☆
32
9x9
↓
20
42 ✯✯☆☆☆
36
28
11x8
↓
18
Tower 36-28
43 ★✯☆☆☆
4
60
16
10x9
↓
16
Tower 4-60-16
47 ★★☆☆☆
16
31
15
10x8
↓
22
Tower 16-31-15
48 ★★☆☆☆
70
34
4
11x9
↓
25
Tower 70-34-4
49 ★★✯☆☆
34
2
8
10x9
↓
21
Tower 34-2-8
51 ✯✯☆☆☆
33
9x9
↓
10
52 ★✯☆☆☆
14
28
9x9
↓
18
Tower 14-28
54 ★✯☆☆☆
6
10
16
10x9
↓
20
Tower 6-10-16
55 ★✯✯☆☆
54
24
162
11x9
↓
16
Tower 54-24-162
57 ★★☆☆☆
4
16
360
10x9
↓
22
Tower 4-16-360
58 ★★✯☆☆
28
28
84
11x9
↓
18
Tower 28-28-84
59 ★★★★☆
16
24
8
10x9
↓
22
This layout makes it hard to make powerups and reach the far side of the board, but Missile+Butterfly is an effective way to clear the Jetsams faster.
Tower 16-24-8
60 ☆☆☆☆☆
9x9
↓
8
61 ★✯✯☆☆
48
9x9
↓
18
62 ★✯☆☆☆
22
48
11x9
↓
18
Tower 22-48
64 ★✯☆☆☆
16
16
18
11x9
↓
20
Tower 16-16-18
66 ★✯✯☆☆
6
36
10x9
↓
20
Tower 6-36
68 ★★☆☆☆
30
30
120
10x9
↓
25
Tower 30-30-120
69 ★★✯☆☆
27
33
54
11x9
↓
24
Tower 27-33-54
70 ★☆☆☆☆
58
100
11x9
↓
18
Tower 58-100
71 ★☆☆☆☆
81
11x9
↓
16
72 ★★☆☆☆
6
324
10x9
↓
20
Tower 6-324
73 ★★☆☆☆
16
144
24
10x8
↓
18
Tower 16-144-24
74 ★✯☆☆☆
18
119
81
9x9
↓
16
Tower 18-119-81
75 ★★✯✯☆
2
28
234
10x9
↓
20
New screenshot coming soon - this level has changed since I established the guide.
Tower 2-28-234
77 ★✯✯☆☆
40
12
18
10x9
↓
18
Tower 40-12-18
78 ★★☆☆☆
12
20
168
10x9
↓
23
Tower 12-20-168
79 ★★✯☆☆
24
120
216
9x9
↓
20
Tower 24-120-216
80 ☆☆☆☆☆
10x9
↓
15
81 ★☆☆☆☆
40
9x8
↓
14
82 ★✯☆☆☆
42
22
10x9
↓
14
Tower 42-22
83 ★★☆☆☆
27
27
72
11x9
↓
24
Tower 27-27-72
84 ★★☆☆☆
63
42
26
9x9
↓
24
Tower 63-42-26
85 ★★☆☆☆
3
44
44
11x9
↓
24
Tower 3-44-44
89 ★★★☆☆
8
58
90
11x9
↓
27
Tower 8-58-90
90 ★★☆☆☆
16
162
120
10x9
↓
23
Tower 16-162-120
91 ★☆☆☆☆
16
10x9
↓
20
92 ★✯☆☆☆
43
12
10x9
↓
22
Tower 43-12
93 ★★☆☆☆
44
44
8
11x9
↓
16
Tower 44-44-8
94 ★✯☆☆☆
228
12
16
11x9
↓
20
Tower 228-12-16
96 ★★☆☆☆
46
80
2
11x9
↓
27
Tower 46-80-2
97 ★☆☆☆☆
25
21
3
10x8
↓
28
Tower 25-21-3
99 ★★☆☆☆
144
8
24
10x9
↓
22
Tower 144-8-24
100 ☆☆☆☆☆
9x9
↓
12
101 ☆☆☆☆☆
15
9x8
↓
20
102 ✯☆☆☆☆
9
23
9x9
↓
20
Tower 9-23
104 ✯✯☆☆☆
28
14
360
11x9
↓
20
Tower 28-14-360
105 ★★☆☆☆
19
41
6
9x9
↓
22
Tower 19-41-6
106 ★✯☆☆☆
12
36
12
10x9
↓
28
Tower 12-36-12
108 ★✯☆☆☆
11
12
24
11x9
↓
21
Tower 11-12-24
109 ★★★☆☆
27
8
32
11x9
↓
24
Tower 27-8-32
110 ★☆☆☆☆
56
30
999
9x9
↓
20
Tower 56-30-999
111 ✯✯☆☆☆
7
60
12
10x9
↓
23
Tower 7-60-12
113 ★✯☆☆☆
12
42
53
10x9
↓
26
Tower 12-42-53
114 ★★☆☆☆
48
70
9x9
↓
32
Tower 48-70
116 ★✯☆☆☆
8
28
144
9x9
↓
25
Tower 8-28-144
118 ★✯☆☆☆
16
24
100
10x9
↓
24
Tower 16-24-100
119 ★★✯☆☆
16
24
360
11x8
↓
27
Tower 16-24-360
120 ☆☆☆☆☆
11x9
↓
15
121 ✯☆☆☆☆
73
9x9
↓
20
122 ★★☆☆☆
25
29
9x9
↓
22
Tower 25-29
124 ★✯☆☆☆
21
28
12
10x9
↓
27
Tower 21-28-12
125 ★★✯☆☆
24
243
14
10x9
↓
26
Tower 24-243-14
126 ★✯☆☆☆
270
4
270
11x9
↓
25
Tower 270-4-270
127 ★★☆☆☆
24
24
135
9x9
↓
26
Tower 24-24-135
128 ★★☆☆☆
28
6
24
10x9
↓
25
Tower 28-6-24
129 ★★✯☆☆
25
25
20
9x9
↓
20
Tower 25-25-20
130 ★☆☆☆☆
135
140
162
11x9
↓
30
Tower 135-140-162
132 ★☆☆☆☆
3
50
189
10x9
↓
24
Tower 3-50-189
133 ★✯☆☆☆
24
21
6
11x9
↓
23
↺★ Map
There are yellow tiles under the boxes, so use a powerup or form a match alongside them to create a cascade of matches. The level always starts with yellow tiles next to the boxes, so you can reset until you're able to form a match 5 towards the top.
Tower 24-21-6
134 ★☆☆☆☆
18
54
234
11x9
↓
22
Tower 18-54-234
135 ★★☆☆☆
16
14
54
11x9
↓
25
Tower 16-14-54
136 ★✯☆☆☆
32
120
16
11x9
↓
28
Tower 32-120-16
138 ✯☆☆☆☆
26
37
12
11x9
↓
27
Tower 26-37-12
139 ★★★☆☆
9
16
315
11x9
↓
26
Tower 9-16-315
140 ☆☆☆☆☆
10x9
↶
12
141 ✯☆☆☆☆
4
9x9
↓
20
142 ★✯☆☆☆
6
39
9x9
↓
25
Tower 6-39
144 ★✯☆☆☆
4
4
108
10x8
↓
26
Tower 4-4-108
145 ★✯☆☆☆
4
20
60
9x9
↓
26
Tower 4-20-60
146 ★☆☆☆☆
8
10
8
11x8
↓
24
Tower 8-10-8
148 ★☆☆☆☆
4
27
35
9x9
↓
26
Tower 4-27-35
149 ★★☆☆☆
4
28
20
10x9
↓
28
Chocolates are not an objective.
Tower 4-28-20
150 ★✯☆☆☆
32
38
270
11x9
↓
26
Tower 32-38-270
152 ★☆☆☆☆
20
16
4
10x9
↓
28
Tower 20-16-4
153 ★✯☆☆☆
4
4
34
10x9
↓
24
Tower 4-4-34
154 ★★☆☆☆
5
5
30
10x9
↓
24
Tower 5-5-30
155 ★★✯☆☆
90
16
30
9x9
↓
27
Tower 90-16-30
157 ★★☆☆☆
80
8
52
10x9
↓
22
Tower 80-8-52
159 ★★✯✯☆
15
8
77
11x9
↓
28
Tower 15-8-77
160 ☆☆☆☆☆
10x9
↓
10
161 ★☆☆☆☆
76
9x9
↓
20
163 ★☆☆☆☆
24
40
11x9
↓
23
Tower 24-40
164 ✯✯☆☆☆
24
24
30
10x9
↓
26
Tower 24-24-30
165 ★★★☆☆
16
3
33
11x9
↓
28
Tower 16-3-33
167 ★✯☆☆☆
2 Center Columns
52
2
468
10x8
↓
22
Double tap or do a double Missile combo to ensure all four starting Missiles hit the Paintings in the first move. If the Paintings aren't cleared, then there won't be enough tiles to make a match and it will forfeit the level.
Tower 52-2-468
168 ✯✯☆☆☆
38
3
90
10x9
↓
25
Tower 38-3-90
169 ★✯✯☆☆
19
6
32
11x9
↓
28
Tower 19-6-32
170 ★★☆☆☆
369
200
200
11x9
↓
24
Tower 369-200-200
171 ★✯☆☆☆
48
48
110
11x9
↓
23
Tower 48-48-110
172 ★★☆☆☆
4
34
28
11x9
↓
21
Tower 4-34-28
173 ★☆☆☆☆
22
22
22
11x9
↓
25
Tower 22-22-22
174 ★✯☆☆☆
19
3
19
11x9
↓
24
Tower 19-3-19
176 ★★☆☆☆
84
80
720
10x9
↓
25
Tower 84-80-720
177 ★★☆☆☆
8
30
56
10x9
↓
25
Tower 8-30-56
178 ★★☆☆☆
36
36
8
9x9
↓
25
Tower 36-36-8
179 ★★★☆☆
2
34
42
11x9
↓
23
Tower 2-34-42
180 ☆☆☆☆☆
11x9
*
11
* Tiles originate from the top and generally flow down. The two columns on each side turn inward at the bottom, and then up.
181 ✯☆☆☆☆
6
9x9
↓
20
182 ★☆☆☆☆
6
4
10x9
↓
25
Tower 6-4
184 ★✯☆☆☆
4
24
120
10x9
↓
23
There are Butterflies under the Puzzle boards.
Tower 4-24-120
185 ★★✯☆☆
4
24
24
9x8
↓
24
Tower 4-24-24
186 ★✯☆☆☆
12
24
5
10x9
↓
24
Tower 12-24-5
188 ★★☆☆☆
8
3
162
10x9
↓
25
Tower 8-3-162
190 ★★☆☆☆
150
999
55
10x9
↓
22
Tower 150-999-55
191 ★✯☆☆☆
2
24
39
11x9
↓
26
Tower 2-24-39
192 ★✯☆☆☆
3
28
220
9x9
↓
25
Tower 3-28-220
193 ★★☆☆☆
36
4
18
10x9
↓
23
Tower 36-4-18
194 ★☆☆☆☆
3
18
12
10x9
↓
27
Tower 3-18-12
195 ★★✯✯☆
18
5
60
11x9
↓
24
Tower 18-5-60
196 ★☆☆☆☆
4
44
72
11x9
↓
29
Tower 4-44-72
197 ★★☆☆☆
16
30
16
10x9
↓
25
Tower 16-30-16
199 ★★✯☆☆
6
12
66
11x9
↓
25
Tower 6-12-66
200 ☆☆☆☆☆
11x8
↓
12
201 ✯☆☆☆☆
15
9x9
↓
18
202 ✯☆☆☆☆
32
26
9x9
↓
22
Tower 32-26
204 ★✯☆☆☆
20
26
180
10x9
↓
26
Tower 20-26-180
205 ★★☆☆☆
24
24
35
11x9
↓
28
You can make a Missile and Bomb to combo with the initial tiles.
Tower 24-24-35
206 ★☆☆☆☆
36
450
257
9x9
↓
22
Tower 36-450-257
207 ★✯☆☆☆
3
3
39
11x9
↓
27
Tower 3-3-39
209 ★★✯☆☆
20
30
170
10x9
↓
29
Tower 20-30-170
211 ★✯☆☆☆
8
40
8
11x9
↓
27
Tower 8-40-8
212 ★★☆☆☆
16
46
72
11x9
↓
26
Tower 16-46-72
213 ★✯☆☆☆
4
20
144
10x9
↓
27
Tower 4-20-144
214 ★★☆☆☆
6
14
54
11x9
↓
24
Tower 6-14-54
215 ★★★☆☆
21
33
120
11x9
↓
27
Tower 21-33-120
217 ★★☆☆☆
15
16
135
11x9
↓
27
Tower 15-16-135
218 ★★☆☆☆
16
22
25
11x9
↓
28
Tower 16-22-25
219 ★★★✯☆
8
27
60
11x9
↓
27
Missile+Butterfly is an effective combo for this layout. Clearing the first curtain will make it a lot easier to maneuver.
Tower 8-27-60
220 ★★☆☆☆
71
39
71
10x9
↓
20
Make sure to trigger all four butterflies in the first move by double tapping.
Tower 71-39-71
221 ★★☆☆☆
8
18
162
10x9
↓
24
Tower 8-18-162
222 ★✯☆☆☆
99
6
9
11x9
↓
25
Tower 99-6-9
224 ★★☆☆☆
8
34
12
10x9
↓
25
Tower 8-34-12
225 ★★★✯☆
24
4
300
10x9
↓
20
Tower 24-4-300
226 ★★☆☆☆
100
6
88
11x9
↓
23
Tower 100-6-88
227 ★★☆☆☆
6
2
30
10x9
↓
26
Tower 6-2-30
228 ★★✯☆☆
36
6
36
11x9
↓
25
Tower 36-6-36
229 ★★★★★
189
21
30
11x9
↓
24
Tower 189-21-30
230 ☆☆☆☆☆
9x9
↓
15
231 ✯✯☆☆☆
60
11x9
↓
19
232 ✯✯☆☆☆
14
24
11x9
↓
22
Tower 14-24
233 ★✯☆☆☆
48
20
3
11x9
↓
27
Tower 48-20-3
234 ★✯☆☆☆
30
28
12
10x9
↓
22
Tower 30-28-12
235 ★★✯☆☆
32
20
72
10x9
↓
24
Tower 32-20-72
237 ★✯☆☆☆
20
23
10
9x9
↓
25
Tower 20-23-10
238 ★✯☆☆☆
7
40
16
11x9
↓
25
Tower 7-40-16
239 ★★★★★
70
4
18
10x9
↓
24
This level mostly relies on luck to make any powerups, much less good combos. Bomb+Butterfly is pretty helpful. Once hearts stop spawning, any Nova combo is particularly effective due to the checkerboard pattern.
Tower 70-4-18
240 ★★✯☆☆
49
27
300
11x9
↓
27
Tower 49-27-300
241 ✯☆☆☆☆
4
9
9x9
*
22
* Tiles originate from the bottom center, flow around the outside, and then all go down in the middle.
Tower 4-9
242 ★★✯☆☆
20
24
11x9
↺
24
Tower 20-24
243 ★✯☆☆☆
16
8
180
10x8
←
24
Tower 16-8-180
244 ★★☆☆☆
6
6
38
10x9
↑
25
Tower 6-6-38
245 ★★★✯☆
22
20
22
11x9
⤿
22
Tower 22-20-22
246 ★★★★☆
40
54
200
11x9
↓
24
There is no benefit to starting with powerups in this level. In fact, sometimes they can prevent the Toy Boxes from clearing properly. Whenever possible, swipe Missiles into the columns full of Hearts.
Tower 40-54-200
248 ★✯☆☆☆
4
16
13
11x9
↑
26
Tower 4-16-13
249 ★★★✯☆
15
42
24
11x9
↶
23
Tower 15-42-24
250 ★☆☆☆☆
4
100
200
10x8
↓
20
Tower 4-100-200
251 ★★✯☆☆
4
24
288
11x9
↓
28
252 ★★☆☆☆
5
22
10
10x8
↓
26
253 ★✯☆☆☆
6
27
90
10x9
←
27
There are Missiles under the Puzzle boards on the left side.
254 ★★✯☆☆
39
3
2
10x9
*
30
↺★ Map
* Main sections flows counter-clockwise from top left to top right, while the center section simply flows down.
255 ★★★☆☆
12
3
150
10x9
↓
22
256 ★★✯☆☆
30
20
24
11x9
↓
27
257 ★★☆☆☆
40
38
38
11x9
↓
26
259 ★★★☆☆
5
32
21
11x9
↓
25
260 ☆☆☆☆☆
11x9
↓
18
261 ☆☆☆☆☆
46
11x9
↓
20
262 ✯✯☆☆☆
42
42
11x7
↓
22
263 ★✯☆☆☆
4
36
54
10x9
↓
23
264 ★✯☆☆☆
16
24
144
11x9
↑
22
265 ★★☆☆☆
18
45
40
11x9
↓
26
266 ✯☆☆☆☆
4
72
175
11x9
↓
20
267 ★☆☆☆☆
8
24
30
11x9
↓
27
268 ★★✯☆☆
4
40
43
11x9
↓
26
269 ★★★★☆
48
60
24
9x9
↓
24
270 ★✯☆☆☆
32
220
486
11x9
↓
25
272 ★★☆☆☆
36
3
216
11x9
↓
28
273 ★★☆☆☆
8
32
64
11x9
↓
23
274 ★★✯☆☆
42
40
65
11x9
↓
27
275 ★★★☆☆
27
8
180
11x9
↓
28
276 ★☆☆☆☆
225
15
450
11x9
↑
26
277 ★★☆☆☆
40
24
8
10x9
↓
25
278 ★✯☆☆☆
16
40
67
11x9
↓
28
279 ★★★☆☆
36
36
45
11x9
↓
29
281 ★★★☆☆
45
16
28
11x9
↓
30
283 ★★✯☆☆
29
26
23
9x9
↓
30
284 ★★✯☆☆
2
120
18
10x9
↓
22
285 ★★✯☆☆
3
25
4
11x9
↓
27
286 ★✯☆☆☆
3
21
38
9x9
↓
26
288 ★★☆☆☆
6
40
21
11x9
*
24
* Tiles originate from the top right, flow counter-clockwise, and then turn up at the bottom corner.
289 ★★★★☆
4
44
18
11x9
↓
26
290 ★★☆☆☆
50
80
12
11x7
*
20
* In the left section, tiles originate from the right side and turn down at the top left corner. The right section flows down.
291 ★✯☆☆☆
4
16
9
11x9
←
24
Chocolates are not an objective.
292 ★★☆☆☆
8
16
48
11x9
←
30
293 ★★☆☆☆
16
12
15
10x9
↓
20
294 ★★✯☆☆
30
30
20
10x9
↓
28
295 ★★★★★
24
4
35
11x9
↓
22
Focus on the puzzle pieces under the Wheat initially, as there are more fully Petrified Faeries under the Puzzle boards.
296 ✯☆☆☆☆
18
93
12
11x9
↓
24
297 ★★☆☆☆
160
49
15
11x7
↓
20
298 ★✯☆☆☆
60
30
15
11x9
↓
26
299 ★★★☆☆
37
4
24
11x9
↓
28
This level starts with the option to form two Missiles in the first turn. Sometimes one or both of them can become Novas instead.
300 ☆☆☆☆☆
9x9
↓
20
301 ✯☆☆☆☆
66
9x8
↓
20
302 ★✯☆☆☆
3
100
9x9
↓
22
303 ★✯☆☆☆
360
4
24
10x9
↓
22
304 ★★☆☆☆
36
16
16
10x9
↓
22
305 ★★✯☆☆
18
48
48
10x9
↓
27
306 ★★✯☆☆
6
50
100
10x9
↓
28
307 ★★✯☆☆
4
120
486
10x9
↓
27
308 ★★☆☆☆
9
30
22
9x9
↓
25
309 ★★★✯☆
27
47
20
10x9
→
28
311 ★★✯☆☆
18
42
5
9x9
↓
25
312 ★★✯☆☆
27
3
53
10x9
↓
27
313 ★★★☆☆
4
12
28
9x9
↓
22
314 ★★✯☆☆
2
10
4
11x8
*
24
* Tiles originate from the top of the central area and flow down. The centermost column flows down only, while each of the adjacent columns split into two streams that flow towards the outside and up.
315 ★★✯☆☆
26
20
26
10x9
*
23
* All columns flow down, except the top and bottom rows, which flow left.
316 ★★☆☆☆
29
5
3
9x9
↓
23
317 ★★✯☆☆
46
8
46
11x9
↓
30
318 ★★★☆☆
32
78
32
11x9
↓
21
319 ★★★★☆
21
20
21
9x9
↓
22
320 ★☆☆☆☆
8
12
120
10x9
↓
22
321 ★★✯☆☆
26
18
32
11x9
↓
27
324 ★✯✯☆☆
2
41
28
11x9
↓
26
325 ★★✯✯☆
4
16
16
11x9
↓
27
326 ★✯✯☆☆
20
18
12
11x9
↓
25
328 ★★✯☆☆
25
25
70
11x9
↓
25
329 ★★★✯☆
4
27
2
9x9
↓
25
330 ★★✯☆☆
4
16
16
9x9
↓
21
331 ★★✯☆☆
22
33
66
11x9
→
23
332 ★★✯☆☆
28
24
36
10x8
↷
27
333 ★★✯☆☆
32
16
18
11x9
↓
28
334 ★✯☆☆☆
36
6
6
11x8
↓
26
335 ★✯✯☆☆
36
27
3
9x9
↓
30
337 ★✯☆☆☆
14
2
342
10x9
*
22
* The outside edges originate from the top inside edge, flow along the outside, and end on the bottom inside edge. The center section flows down.
338 ★★✯☆☆
20
20
140
10x9
↓
25
339 ★★★☆☆
54
27
243
10x9
↓
28
340 ★✯☆☆☆
14
72
11x9
↓
22
342 ★★✯✯☆
26
4
20
11x8
↓
25
343 ★★✯✯☆
20
2
20
10x9
↓
26
344 ★★✯☆☆
38
22
4
11x9
↻
26
345 ★★★★✯
108
18
37
10x9
←
28
If you have streak powerups, reset until you can get a first move Nova+Bomb. It will give you a headstart on the Ukuleles and closest Faeries.
347 ★★✯☆☆
20
33
33
10x9
↓
26
348 ★★✯☆☆
5
44
4
11x9
*
25
* Tiles originate from the bottom. The centermost column flows up, and the others flow up, turn towards the outside, and flow down.
349 ★★✯✯✯
10
10
20
9x9
↓
24
Bomb+Butterfly is generally helpful.
350 ☆☆☆☆☆
11x9
↓
18
351 ✯☆☆☆☆
4
9x9
↓
20
352 ★☆☆☆☆
4
35
10x9
↓
22
353 ✯☆☆☆☆
4
28
9x9
↓
22
354 ★✯☆☆☆
4
45
52
9x9
↓
22
355 ★★★✯✯
1
44
68
9x8
↓
24
If you have streak powerups, reset until you can get a first move Nova+Bomb. They'll make a lot of progress on the Mystery Bomb, if not set it off instantly.
356 ✯✯✯☆☆
12
64
16
11x9
↓
23
357 ★★✯☆☆
20
5
70
10x9
↓
24
358 ★★☆☆☆
80
35
10
10x9
↓
24
359 ★★★✯☆
35
234
8
11x9
↓
25
360 ★★☆☆☆
216
18
2
11x9
↓
23
361 ✯☆☆☆☆
4
18
18
10x9
↓
23
363 ★★☆☆☆
30
22
30
11x9
*
26
* Tiles originate from the top left and follow the corners to the bottom right.
364 ★★☆☆☆
16
4
4
10x9
↓
24
365 ★★✯☆☆
4
16
27
10x9
↓
23
366 ★✯☆☆☆
51
6
6
9x9
↓
25
367 ★✯☆☆☆
4
3
20
11x9
↓
21
369 ★★★★★
60
16
3
9x9
↓
25
↺★ Map
The trickiest obstacle is the Constellation in the bottom left. Generally just focus on making big combos.
370 ★☆☆☆☆
32
900
20
9x9
↓
20
371 ★★☆☆☆
45
15
15
10x9
↓
27
372 ★★☆☆☆
16
29
4
9x9
↓
24
374 ★☆☆☆☆
12
4
4
10x9
↓
22
375 ★★★✯✯
32
9
39
11x9
↓
25
If possible, start this level with a Nova and Bomb and reset until they spawn next to each other - it should clear all or most of the Honey and make some room to take care of the rest of the obstacles.
376 ★★☆☆☆
540
36
324
9x9
↓
20
379 ★★★★✯
4
20
25
9x9
↓
23
Acorns are under the green Wheat, and Faeries are under the gold Wheat.
380 ★☆☆☆☆
4
100
80
9x8
↓
22
381 ★✯☆☆☆
4
6
17
9x9
↓
26
382 ★★☆☆☆
4
46
49
11x9
↓
26
383 ★☆☆☆☆
15
55
60
11x9
↶
28
You can always make a Bomb or Missile with the starting tiles. The ideal move is to make a Missile and then shoot it through the center of the green boxes, which will then form two Novas.
384 ★★★★☆
50
3
20
10x9
↓
25
You can form a Bomb in the first turn. But if you have streak powerups, reset until your Nova+Bomb spawn together and do that instead - the starting tiles are in an ideal position to clear a lot of space.
385 ★★☆☆☆
16
4
21
10x9
↓
26
386 ★☆☆☆☆
28
30
90
10x9
↓
22
387 ✯☆☆☆☆
150
60
207
9x9
*
23
* Counter-clockwise from upper right side to lower right side.
388 ★★☆☆☆
32
8
24
9x9
⤿
22
389 ★★★★☆
24
8
24
11x9
↓
29
↺★ Map
Four Missiles can be formed with the starting tiles. Ideally, set them off individually to get multiple hits on the Fishing Ponds, or try to match them with the streak Nova.
390 ★✯☆☆☆
53
40
140
9x9
↓
20
391 ★★☆☆☆
2
35
24
11x9
↓
25
392 ✯✯☆☆☆
25
46
12
11x9
↓
27
393 ★✯☆☆☆
36
4
70
11x9
↓
25
There are Butterflies under the green and purple boxes, and matching Neopets under the red and yellow boxes.
394 ★✯☆☆☆
6
12
16
9x9
↓
27
396 ★✯✯☆☆
54
28
26
11x9
↓
24
397 ★✯☆☆☆
45
16
120
11x9
↓
27
398 ★✯☆☆☆
24
50
16
11x9
↓
24
399 ★★★★✯
4
12
16
11x9
←
20
Butterfly combos tend to be helpful in this level, as it is hard to form powerups within range of the Faeries.
400 ☆☆☆☆☆
9x9
↓
15
401 ★✯☆☆☆
54
9x9
↓
18
402 ★✯☆☆☆
20
20
60
9x9
↓
22
403 ★☆☆☆☆
22
44
9x9
↓
24
404 ★★★☆☆
18
30
16
11x9
↓
22
405 ★★★★★
10
7
25
11x9
↓
24
↺★ Map
As with many Negg Crate levels, start with a Bomb if possible. If you don't have one, reset until you can form one in the first turn.
406 ★✯✯☆☆
5
25
6
10x9
*
25
* Counter-clockwise from top right for the outside stream, and from the left side for the rest. They turn upward at the bottom right corner.
407 ★✯☆☆☆
42
2
12
11x9
↓
26
408 ★✯☆☆☆
20
24
25
11x9
↓
25
409 ★★★✯✯
54
35
14
11x9
↓
28
Starting with any strong powerup combo should help a lot. The main constraint is the narrow starting space.
411 ★✯☆☆☆
3
31
21
10x9
↓
25
412 ★✯☆☆☆
25
75
6
11x9
↱
20
413 ★★☆☆☆
16
3
16
9x9
↓
26
414 ★★✯☆☆
41
30
80
11x9
↓
25
415 ★★✯✯☆
6
48
45
9x9
↓
26
416 ★✯✯☆☆
30
11
38
11x9
↓
22
417 ★★✯☆☆
32
4
24
10x9
↓
22
418 ★★★☆☆
22
18
18
10x9
→
22
419 ★★✯✯☆
50
18
40
10x9
↓
28
420 ★☆☆☆☆
100
39
200
11x9
↓
25
Make sure to clear Negg trays ASAP to uncover cookies.
422 ★★☆☆☆
16
48
48
9x9
↓
22
424 ★★☆☆☆
83
18
16
11x9
↓
26
426 ★✯☆☆☆
After Acorns
4
48
48
9x9
↓
23
427 ★★☆☆☆
6
28
48
10x9
↓
27
428 ★★✯☆☆
4
24
12
9x9
↓
21
429 ★★★✯☆
4
19
30
9x9
↓
27
430 ★✯☆☆☆
Left Center
After Hearts
42
120
42
10x9
*
27
You can form a Bomb in the first turn. If you have a streak going, aim to make a Bomb+Bomb combo.
* Central section flows right. Two streams originate from the top left and flow clockwise to the bottom left. The two rightmost columns flow down.
431 ★✯☆☆☆
10
3
18
10x9
←
30
432 ★★☆☆☆
4
16
100
9x9
↓
24
433 ★✯☆☆☆
9
60
36
10x9
↓
24
434 ★★☆☆☆
4
36
25
10x9
←
26
435 ★★☆☆☆
4
8
38
10x9
↓
24
436 ★✯☆☆☆
4
24
24
10x9
↓
25
437 ★★☆☆☆
24
37
80
11x9
↓
26
438 ★✯☆☆☆
4
28
135
11x9
↓
26
439 ★★✯✯☆
216
26
9
11x9
↓
27
441 ✯✯☆☆☆
24
4
8
11x9
↓
24
There are Missiles under the Puzzle boards.
442 ★✯☆☆☆
16
6
33
10x9
↓
27
443 ★★★✯☆
3
30
160
10x9
↓
24
444 ★✯☆☆☆
28
20
12
10x9
→
24
445 ★★★☆☆
24
44
44
11x9
⤾
22
446 ★✯☆☆☆
16
6
72
11x9
↓
27
447 ★★☆☆☆
6
120
80
10x9
↓
28
448 ★✯☆☆☆
16
64
48
10x9
↓
25
Cookies are not an objective.
449 ★★★✯✯
30
15
45
9x9
↓
24
If you have streak powerups, reset until you can get a first move Nova+Bomb. It will break through the layers around the central starting area.
450 ☆☆☆☆☆
11x9
↓
12
451 ☆☆☆☆☆
24
9x9
↓
20
452 ✯☆☆☆☆
16
36
9x9
↓
22
453 ✯☆☆☆☆
6
8
40
9x9
↓
22
454 ★✯☆☆☆
30
36
8
11x9
↓
24
You can form two Missiles with the starting tiles. Ideal, pair one of them with the streak Nova.
455 ★★✯☆☆
27
15
12
10x9
↓
21
456 ★✯☆☆☆
6
6
30
10x9
↓
26
458 ★✯☆☆☆
25
28
25
9x9
←
26
460 ★★☆☆☆
70
99
18
9x9
↓
21
461 ★✯✯☆☆
42
51
12
9x9
↓
24
462 ★★☆☆☆
16
8
76
10x9
↓
22
463 ★✯☆☆☆
5
25
16
11x8
↓
23
464 ★✯☆☆☆
11
8
24
11x9
↓
26
465 ★★★★✯
27
170
34
10x9
↓
27
Cookies are not an objective.
This is one of the hardest levels in the game. If you have a streak Nova, add a Nova Booster and reset until they spawn next to each other. Nova+Nova is the most powerful combo in the first move. If that's not possible, any powerup or combo that can clear all the colored tiles below the Toy Boxes simultaneously is a good way to start. With any luck, the Unis will turn into helpful powerups. Butterflies tend to be less helpful than usual, as they tend to focus on the top half of the board.
467 ★★☆☆☆
2
28
44
11x8
↓
24
468 ★✯☆☆☆
7
15
27
11x9
↓
23
469 ★★★★★
24
19
23
11x9
↓
26
If you have streak powerups, reset until you can get a first move Nova+Bomb. After clearing a little more space, try to focus down so combos can reach the whole board.
472 ★✯☆☆☆
3
21
35
11x9
↓
25
473 ★★✯☆☆
8
24
24
11x9
*
26
* Top left section flows right. The main section flows down and to the left.
474 ★☆☆☆☆
240
39
23
11x9
↓
28
475 ★★☆☆☆
21
24
96
11x9
←
32
476 ★✯☆☆☆
16
16
84
10x9
↓
20
478 ★✯☆☆☆
8
16
540
11x9
↓
24
479 ★✯✯☆☆
18
16
18
10x9
↓
26
480 ★☆☆☆☆
28
120
184
11x9
↓
24
481 ★★☆☆☆
2
16
34
10x9
↓
25
482 ★✯✯☆☆
25
20
15
9x9
↓
26
483 ★✯☆☆☆
12
24
69
9x9
⤵
24
484 ★✯☆☆☆
2
9
52
10x9
↓
24
485 ★★★★✯
8
8
28
11x9
↓
28
↺★ Map
Try to focus on clearing Curtains early, as they block access to obstacles.
486 ★★☆☆☆
21
21
3
11x9
↓
22
487 ★✯✯☆☆
39
12
16
10x9
↓
27
You can form two Missiles with the starting tiles. Aim to use them on the Negg Crate. There are Butterflies behind the Negg Crate.
488 ★✯☆☆☆
320
270
6
10x9
↓
26
489 ★★★★☆
16
36
135
11x9
↑
29
You can make a Bomb with the starting tiles.
490 ★☆☆☆☆
25
50
150
9x9
↓
20
491 ★✯✯☆☆
Outside Edges
24
30
11x9
↓
20
492 ★✯☆☆☆
30
2
12
9x9
↓
22
493 ★★★☆☆
25
4
77
11x9
↓
25
494 ★★✯☆☆
33
33
30
11x9
↓
23
495 ★★✯✯☆
4
5
20
11x8
←
24
496 ★✯☆☆☆
4
4
450
11x9
*
20
↺★ Map
* Outside section flows clockwise from the bottom left. Center section flows down.
498 ★★☆☆☆
45
21
40
11x9
*
22
* Top section originates from lower left and flows clockwise to lower right. Bottom section flows down.
499 ★★★★★
8
9
54
11x9
↓
26
↺★ Map
This is an infamous level, but it's actually a lot easier than it first appears. If you have streak powerups, reset until you can get a first move Nova+Bomb. The key is to focus on the Constellations in the center, particularly the ones under Faeries. Clearing all Constellations will damage the cookies in the outer corners, by which time it's a lot easier to polish them off.
500 ☆☆☆☆☆
9x9
↓
20
501 ✯☆☆☆☆
42
9x8
↓
20
502 ✯☆☆☆☆
42
23
9x9
↓
23
503 ✯✯☆☆☆
6
11x9
↓
23
Ice Blocks are not an objective.
505 ★★★★✯
3
36
100
11x9
↓
21
Any strong powerup combo is good for this level. Like any level with Ice Blocks, Novas and their combos are less effective than they could be, but they can still help break through the ice.
508 ★★☆☆☆
4
29
57
11x9
↓
26
509 ★★★✯☆
16
19
50
9x9
↓
25
Hearts spawn in the bottom left only, so it's important to clear the Mystery Bomb on the left side early.
510 ★✯☆☆☆
2
12
16
10x9
↓
20
511 ★✯☆☆☆
4
15
36
9x9
↓
22
512 ★✯☆☆☆
4
160
50
10x9
↓
24
513 ★★☆☆☆
5
3
53
10x9
*
22
↺★ Map
* Counter-clockwise from bottom center to right side, which then flows down.
514 ★✯✯☆☆
15
225
52
11x9
↓
30
515 ★★★✯☆
46
22
20
11x9
↓
25
516 ★★✯☆☆
8
12
37
11x9
→
25
517 ★✯☆☆☆
2
16
64
11x9
↓
27
518 ★★☆☆☆
48
24
540
11x9
↓
22
Make a match or use a powerup in the bottom half first - it will clear the Chocolates and open the Toy Boxes, which will create matches to clear the rest of the Chocolates.
519 ★★★★✯
63
9
50
9x9
↓
30
Ice Blocks spawn above the Bottled Butterflies.
520 ★★☆☆☆
Sides
Center
63
50
100
11x9
↓
25
521 ★★✯☆☆
52
32
1
9x9
↓
24
524 ★✯✯☆☆
14
25
43
11x9
↓
25
526 ★✯☆☆☆
7
70
19
9x9
↓
24
There are Missiles behind the Ukuleles.
527 ★★☆☆☆
20
16
5
10x9
↓
24
Avoid powerup combos, particularly Bomb+Butterfly, that could release the Bottled Butterflies until you have more room to maneuver.
528 ★✯☆☆☆
21
4
16
11x9
↓
27
529 ★★★✯✯
8
16
27
11x9
↓
27
↺★ Map
Missile+Nova would be the best way to get a head start. Missiles are generally your friend in this level. Constellations are scattered enough that focusing on them could help clean up any remaining Boxes.
531 ★★✯☆☆
24
22
16
10x9
↓
31
532 ★★✯☆☆
8
4
24
10x9
*
25
* Tiles originate from the top, split in half at the bottom, and flow along the outside edge.
533 ★☆☆☆☆
27
21
26
10x9
↓
29
You can form a Missile with the starting tiles.
534 ★★✯☆☆
108
4
4
9x9
↓
23
535 ★★✯☆☆
31
2
4
10x9
↓
27
537 ★✯☆☆☆
8
8
14
10x9
↓
24
538 ★★☆☆☆
5
28
20
10x9
↓
25
540 ✯☆☆☆☆
34
35
35
11x9
↓
25
542 ★✯☆☆☆
100
20
14
11x9
↻
25
543 ★★✯☆☆
2
24
6
11x9
↓
22
544 ✯✯✯☆☆
16
2
28
10x9
↓
22
545 ★★✯☆☆
52
26
16
11x9
↓
28
Ice Blocks are not an objective.
546 ★✯☆☆☆
2
11
33
11x9
↓
25
547 ★✯☆☆☆
24
24
14
11x8
↓
27
548 ★★✯☆☆
10
4
43
11x9
↓
22
549 ★★✯✯☆
20
6
90
10x9
↓
24
There are three Butterflies under each Puzzle board.
550 ☆☆☆☆☆
10x9
↓
18
551 ★☆☆☆☆
85
10x9
↓
24
552 ★✯☆☆☆
46
8
10x9
↓
25
553 ★★✯✯☆
20
30
15
9x9
↓
24
554 ★✯☆☆☆
27
24
170
11x9
↓
25
555 ★★✯✯✯
24
18
2
10x9
↓
24
↺★ Map
If you have streak powerups, reset until you can get a first move Nova+Bomb. There are only two Constellations, so focusing on them can help clear up extra Faeries.
557 ★★✯☆☆
2
3
72
11x9
↓
22
558 ★★✯☆☆
180
27
54
11x9
↓
25
559 ★★✯✯☆
20
16
140
11x9
↓
30
560 ★✯☆☆☆
6
54
2
10x9
↓
20
561 ★✯☆☆☆
2
50
4
10x9
↓
22
562 ★★☆☆☆
20
20
144
9x9
↓
28
563 ★★✯☆☆
42
7
30
9x9
↓
25
564 ★★✯☆☆
8
11
8
11x9
↓
24
Wheat is not an objective.
565 ★★✯☆☆
16
14
14
10x8
↓
24
566 ★★★✯☆
9
16
288
9x9
↓
22
Match the yellow tiles on top of the crates for a cascade of matches.
567 ★★★✯☆
2
21
243
9x9
↓
23
568 ★★✯☆☆
5
24
16
10x9
↓
24
569 ★★★✯✯
54
240
36
11x9
↓
25
Bomb+Butterfly is a good first move. It's best to open the Toy Boxes as simultaneously as possible, but the tricky part is actually the Ukuleles. Nova combos, including Nova+Butterfly, are critical.
570 ★✯☆☆☆
Left
Right
160
16
300
11x9
↓
20
571 ★★✯☆☆
2
55
15
11x9
*
26
↺★ Map
* Top row originates from the right and flows around the corner towards the inside of its section. Likewise, the bottom row originates from the left and and flows around the corner towards the inside of its section. All other rows originate from the outside edge and flow inward.
572 ★✯☆☆☆
5
42
45
11x9
↑
25
573 ★★★☆☆
62
4
32
11x8
↓
24
574 ★★✯☆☆
25
33
9
10x9
↓
25
575 ★★★★✯
16
24
46
11x9
↓
22
You can make a Nova Rod on the first move, but you can also make a second directly below it with a couple more moves. If you have streak powerups, it would be more worthwhile to reset for a first move Nova+Bomb, as the red tiles are perfectly positioned for maximum effect. Alternatively, starting with a Bomb that spawns below the default match 5 would allow the same combo within two moves.
576 ★★☆☆☆
16
20
16
11x9
↓
24
578 ★★✯☆☆
2
24
28
11x9
↓
28
There are Butterflies under the Puzzle boards.
579 ★★★✯☆
6
16
24
11x9
↓
26
581 ★★✯☆☆
8
33
99
9x9
↓
25
582 ★★☆☆☆
20
190
24
11x9
↓
27
583 ★★✯☆☆
30
42
21
11x9
*
24
* Flow generally originates from the top left and follows the curve to the bottom right, but each stream starts and ends at different points. The outermost columns simply flow down. The middle stream runs through the whole level. The other two streams follow the outside edges - inner left side to top edge, and bottom edge to inner right side.
584 ★★✯☆☆
4
24
24
11x9
↓
23
585 ★★★★✯
18
16
18
11x9
↓
23
If you have streak powerups, reset until you can get a first move Nova+Bomb. It's difficult to reach the upper Fishing Ponds, so make sure to focus on clearing tiles at the top if at all possible.
586 ★★✯☆☆
2
12
50
10x9
↓
24
587 ★★★✯☆
16
20
36
11x9
↓
25
588 ★★✯☆☆
22
22
15
9x9
↓
26
You can make a Nova with the starting tiles.
589 ★★★★☆
27
50
30
11x9
↓
24
590 ★★☆☆☆
100
200
100
11x9
↓
20
591 ★✯☆☆☆
1
35
8
9x9
↓
24
592 ★☆☆☆☆
6
4
18
9x9
↓
25
↺★ Map
Match the yellow tiles against the boxes to create a cascade of matches. Using streak Powerups can actually disrupt this process, but a Bomb can replicate the default match.
593 ★★☆☆☆
51
20
8
10x9
↓
22
594 ★✯☆☆☆
2
40
16
11x9
↓
26
595 ★★✯✯✯
8
26
150
11x9
↓
28
After triggering the initial powerups, there is only enough space for seven Neopets on the board. Because the four basic colors are available in this level, it's possible for there to not be three of any color. If that's the case, the board will reshuffle once and then forfeit the level.
596 ★★☆☆☆
64
64
12
11x9
↓
28
597 ★★✯☆☆
6
30
54
11x9
↓
27
598 ★★✯✯☆
2
15
25
9x9
↓
24
599 ★★★✯☆
12
25
315
11x9
↓
24
600 ☆☆☆☆☆
11x9
↓
22
601 ✯☆☆☆☆
16
8x9
↓
24
602 ★✯☆☆☆
55
9x9
↓
26
603 ★★★✯☆
4
12
54
9x9
↓
28
604 ★★✯☆☆
486
20
11x9
↓
26
The TVs in this level do not include Butterflies.
605 ★★★★★
60
60
30
10x9
↓
28
This is, in my opinion, the hardest level of the game. Any big powerup combo you can start with will give a necessary advantage - Nova+Nova, Missile+Bomb, or Nova+Bomb will all help create space or reduce the overall layers you have to get through.
607 ★✯☆☆☆
3
180
20
11x9
↑
24
608 ★✯☆☆☆
36
36
30
11x9
→
27
609 ★★★★★
24
36
26
11x9
→
24
There are several fixed colored tiles, which make it impossible for starting powerups to spawn next to each other. However, it's more common to be able to form a Missile in the first turn. Clearing the Wheat early to reveal the Faeries is critical - especially in the bottom right corner.
611 ★★☆☆☆
6
20
40
11x8
↓
26
612 ★✯☆☆☆
2
42
378
10x9
↓
26
613 ★✯☆☆☆
32
28
160
11x8
→
23
614 ★✯☆☆☆
20
28
6
10x9
↓
26
615 ★★✯☆☆
32
22
17
11x9
↓
27
616 ★★☆☆☆
24
18
24
11x9
↓
25
617 ★★✯☆☆
20
16
36
11x9
↓
29
618 ★★★★✯
72
54
5
11x9
↓
24
You can form two Bombs in the first couple turns - red tiles in the top left, and yellow tiles in the bottom right. If you have streak powerups, ideally you would be able to set off both of the free Bombs before activating Nova+Bomb.
619 ★★★★★
9
30
60
10x9
*
30
↺★ Map
You can form a Bomb with the starting tiles. Try to time powerups and combos to hit the center TV to make ideal powerups. Missile+Bomb would be helpful at any time, but Nova+Missile would be perfect once at least the left side is semi cleared.
* Counter-clockwise from top inner left side to top inner right side.
620 ★☆☆☆☆
72
12
100
11x9
↓
22
621 ★✯☆☆☆
7
4
27
9x9
↓
26
622 ★★☆☆☆
24
24
24
11x9
↓
24
623 ★★☆☆☆
7
4
32
9x9
↓
26
If you can beat level 621, you can beat this one.
624 ★★✯✯☆
16
24
24
11x9
↓
26
625 ★★★★✯
25
50
8
11x9
↓
25
Cookies spawn from the outside columns of the center area. Using Missile+Butterfly combos early on can clear the Negg Crates, but as random Neggs sprout and more obstacles appear, Butterflies will target elsewhere. If you're having trouble, using Mega Wands on the Negg Crates is a great alternative to Missile+Butterfly.
626 ★★✯✯☆
70
26
6
10x9
↓
22
627 ★✯✯☆☆
189
23
6
11x9
↓
20
628 ★★★☆☆
10
20
144
10x9
↓
27
629 ★★★★✯
60
20
16
11x8
↓
24
If you have streak powerups, reset until you can get a first move Nova+Bomb AND they're not adjacent to the Chocolates. Making a match next to the Chocolates first will open up space to make the Nova+Bomb more effective.
630 ★✯☆☆☆
8
35
80
11x9
↓
21
631 ★★☆☆☆
21
21
8
11x9
↓
23
632 ★★☆☆☆
2
24
4
11x9
↓
24
633 ★✯☆☆☆
28
60
15
11x8
↓
24
634 ★★★☆☆
15
66
3
11x9
↓
20
635 ★★★✯☆
12
50
43
11x9
↓
26
637 ★★★☆☆
20
34
42
11x9
↓
27
Additional Cookies do not appear until the Negg Tray is cleared.
638 ★★✯☆☆
8
13
4
9x9
↓
22
639 ★★★★✯
20
22
120
10x9
↓
26
Clearing the top right corner of the first Negg Crate is the trickiest thing to do early, so any powerup that can guarantee that is best.
640 ☆☆☆☆☆
57
130
60
9x9
↓
21
641 ★★☆☆☆
50
100
81
11x9
↓
24
642 ★★✯☆☆
20
40
1
10x9
↓
22
643 ★★☆☆☆
29
18
10
10x9
↓
24
644 ★★★✯☆
4
36
36
11x9
↓
24
645 ★★☆☆☆
16
33
99
11x9
↓
28
Ice Blocks are not an objective.
646 ★★✯☆☆
40
40
24
11x9
↓
20
647 ★★✯✯☆
16
16
25
11x9
↓
26
Ice Blocks are not an objective.
649 ★★★✯☆
6
6
23
11x9
↓
22
650 ☆☆☆☆☆
11x9
→
20
651 ★☆☆☆☆
54
9x9
↓
21
652 ★☆☆☆☆
27
34
11x9
↓
20
654 ★★✯☆☆
20
25
153
10x9
↓
24
655 ★★✯☆☆
36
58
72
11x9
↓
22
656 ★✯☆☆☆
28
60
280
11x9
↓
25
657 ★★✯☆☆
35
27
16
11x9
→
23
658 ★✯✯☆☆
5
20
50
11x9
↓
26
659 ★★✯✯☆
50
136
216
11x9
↓
30
660 ★✯☆☆☆
2
54
40
10x9
↓
22
661 ★✯✯☆☆
52
100
3
11x9
↓
24
663 ★★☆☆☆
15
15
69
11x9
↓
25
664 ★★★✯☆
30
72
126
11x9
↓
28
665 ★★★★★
12
48
60
11x9
*
30
You can form a Nova and a Missile in the first move. However, they aren't adjacent and don't make for a great combo. Starting with Missile+Bomb instead could be more helpful.
* Tiles originate from top right corner. Top three streams turn once and end on the bottom left. The last two streams follow the inside corner and end on the bottom right.
667 ★★✯✯☆
47
17
27
11x9
↓
24
668 ★★✯☆☆
32
28
32
11x9
↓
25
669 ★★★★✯
50
8
60
11x9
↓
26
You'll need powerup combos to clear the third stage of the Lights, but letting the Bottled Butterflies loose can easily get in the way of that. Unfortunately, Butterflies are also ineffective at targeting the right Lights. Alternatively, a Mega Wand or two can be very effective to clear the third stage.
670 ★★✯☆☆
50
80
30
11x9
↓
20
671 ★★✯☆☆
16
270
120
11x9
↓
22
672 ★★★☆☆
36
4
40
11x9
↓
22
If you have no bonus powerups at the start of the level, you can make two Missiles with your first move.
673 ★★✯☆☆
4
16
32
11x9
↓
30
674 ★★✯✯☆
37
21
3
11x9
↓
24
675 ★★★☆☆
16
25
25
11x9
↓
23
676 ★★✯✯☆
36
4
324
10x9
↓
24
There are Novas under the second Puzzle board (top left), and Missiles under the last one (bottom left).
677 ★★★★★
7
100
25
11x9
*
22
↺★ Map
I consider this the hardest Green level! Bombs are very handy to take out a stage of Lights in one go. Once you have more space to work with, focusing on big combos is critical to encourage all the Ice Blocks to spawn.
* Five streams originate from the left side and turn down at the corner. Three additional streams in the bottom section simply flow down.
678 ★★✯☆☆
20
8
34
11x9
↓
24
679 ★★★✯✯
12
10
58
11x9
↓
27
If you have streak powerups, reset until you can get a first move Nova+Bomb. You'll need space along the top to target the bottom corners.
681 ★✯☆☆☆
3
4
20
10x9
↓
28
682 ★✯☆☆☆
16
27
42
10x9
↓
25
683 ★★✯☆☆
52
52
46
10x9
↓
28
684 ★✯☆☆☆
28
31
16
10x9
↓
28
685 ★★★★★
3
42
42
11x9
↓
26
If you have streak powerups, consider adding a Nova booster to start with Nova+Nova. There are Cookies under the Wheat, so clearing Wheat uniformly is really helpful. Bomb+Butterfly is a generally helpful combo.
686 ✯☆☆☆☆
2
44
44
10x9
↓
20
There are Missiles under the Puzzle boards.
687 ★★★✯✯
56
28
252
11x9
↓
23
I consider this the second hardest Green level. If you have streak powerups, reset until you can get a first move Nova+Bomb, ideally with the most plentiful color in at least one of the top corners so it can reach a couple of the topmost Boxes. Hearts are under the red Boxes and Lawn Rolls are under the green Boxes. For some reason, Butterflies prefer to target the right side.
688 ★★✯☆☆
36
36
30
11x9
↓
24
689 ★★★✯✯
15
6
75
11x9
*
28
↺★ Map
You can make a Bomb with the starting tiles. Missiles are generally your friend in this level. Take a look at the Constellation map, as you don't have to clear all the Curtains to target all the Constellations.
* Tiles originate from the top left and follow the curves to the bottom right.
690 ★☆☆☆☆
48
630
50
10x9
↓
21
691 ★★☆☆☆
16
34
8
11x9
↓
25
692 ★☆☆☆☆
16
12
32
11x8
↺
29
693 ★★✯☆☆
50
33
15
11x9
↓
25
694 ★★✯☆☆
8
34
18
11x9
↓
25
696 ★☆☆☆☆
20
45
594
11x9
↓
22
697 ★★★☆☆
10
6
27
11x7
↓
28
698 ★★✯☆☆
4
30
270
11x9
↓
26
699 ★★★★★
2
46
50
10x9
↓
29
↺★ Map
There are four Novas between the gaps in the playing area. The main strategy is to reveal the Novas in pairs, so you can set off two Nova+Nova combos. For starting powerups, Nova+Nova is the best option, but Missile+Bomb or even a single Bomb can help clear the Wheat over the Novas in a controlled manner.
700 ☆☆☆☆☆
11x9
*
12
* Bottom left section flows down. The main section flows from the top left to the bottom right.
Gameplay
First off, you can play the game without spending real money! It will be slower going, but it is entirely possible. I do not spend money, and on average it takes me a few weeks to beat the whole game.
General
Starting at level 55, every level ending in 5 is Hard (purple) and every level ending in 9 is Very Hard (red). Prior to that, only levels 39, 45, and 49 are Hard.
Varia is a solid Neopets partner. Partner abilities never cost a move, and Varia's in particular will even target areas with concentrated obstacles. The first phase creates a 3x3 bomb, while her max ability creates a 9x9 bomb. Either is great for buying time or wiping out most of the board, respectively. Additionally, her charging color (red Neopets) is available on every level.
Tia is the second best Neopets partner, and is required for some achievements and daily quests. Bear in mind that not all levels have green Neopets, and she does not target obstacles. I don't recommend using her on hard levels, but her max ability is equivalent to using a Nova Rod, and is thus pretty useful against early game objectives that require matching adjacent. By removing one color on the board, powerups are more likely to be made, and her ability will not remove existing powerups.
Most levels have the same basic Neopet colors - red Draik, yellow Kougra, green Shoyru, and blue Aisha, but it is possible for fewer colors to spawn during the level. Fewer colors will lower the difficulty as it makes powerups easier to make. Most of the time it's red, yellow, and green when there are only three colors. The fifth color is white/teal Korbats, which most often appears along with the other basic colors when you have finished the objectives for a level. Pink Unis are also possible, but only as part of the level objective.
Tip: When you beat a main story level and it shows the rewards you've earned, "Tap to continue" leads back to the town screen, and the Next button leads you to the next level confirmation screen.
Lives and Coins
Hearts/Lives are the most easily renewable resource. The best way to get more lives is to participate in events and sides games, particularly Match Dash - you get 60m unlimited lives when you are the first to beat 15 levels, which can then be repeated. Achievements are also a good source of unlimited lives. Please note that you can save them indefinitely by not claiming your achievements until you need them. Once you do, they will be sent to your notices and expire after a couple weeks if you don't claim them there.
If you join a Guild, you can give or receive hearts from guildmates. Giving fulfills the NeoPass quest for "gifting energy" and also rewards you with 5 Gold Coins. Please note that you can't see old requests when you first join a guild. For receiving hearts, they are automatically sent to your notices when you are given 5/5, or you can manually send them to notices by refreshing your request for hearts.
Gold Coins are a powerful resource, but quite expensive to use at 900 for five extra moves. Spending coins should be used sparingly: only on difficult levels to buy 5 moves when victory is readily apparent. I don't recommend using them to refill lives unless you are just playing to pass the time. There is no shop where you can spend them, but sometimes there are special activities during events that use them. (Ex: the Hatchery during the spring event, and the 50% Bronze Coin booster during events.) Endless mode also costs 500 Gold Coins to get a second play, but do note that so far it hasn't counted for NeoPass quests.
For perspective, you can expect to earn about 21,000 Gold Coins from playing the main levels (20 for Green, 50 for Purple (Hard), and 100 for Red (Very Hard)), and about 12,000 from Gift levels, which occur every 20 levels until level 200, and quickly slow down to every 50 levels. Tower Mode is a great source of daily Coins, and Endless Mode and Guild Grapple provide additional opportunities.
Side games can be a nice source of various resources, but are not worth using resources just to beat them. For instance, the top of the Rainbow Fountain tree is just 3000 coins... but you have to beat 150 levels near consecutively to get there. It'd be easy to spend more coins than you'd earn if you rush it.
Powerup Items
These are the special items that are on the right side of the game board for use during a match. They are really handy, because they do not spend moves! Powerup items can be obtained through most reward systems in the game - events, completing story tasks, side games, etc. You can earn up to six per day from Tower mode, a free one each week from the Negg Tree, and a few every two weeks from the daily login calendar.
These should also be used sparingly on difficult levels in order to secure a victory. Here are some quick tips for using them:
Mini Wand - Clears/damages one tile on the board. I usually use these when I can tell my last move will not be enough to beat the level.
Mega Wand - Clears/damages all tiles in a designated row or column. I tend to use these when I'm getting impatient with a level, but they might be better used on bottleneck objectives like Negg Crates and Lights.
Magic Glove - Swaps two moveable tiles. This is the best Item, in my opinion. You can line up nearby powerups for a perfect combo or make a match.
Rainbow Negg - Shuffles the colored tiles on the board. This is the worst Item, in my opinion. There is no way to know if it will benefit you, and it's rarer to obtain. However, if you aren't desperate enough to spend other resources but are very close to beating a level with a large number of colored tiles, there's a decent chance doing so will create some auto matches or powerups.
See the next section for regular Powerups!
Bronze Coins
Bronze Coins are unique to each event and expire when the event is over. First time players earn 20 per Green level, 30 for Purple, and 40 for Red. Champion players earn 25 per level regardless of difficulty. Tower mode grants 10 per level, which is 150 max per day. Additionally, you can earn up to 100 a day from completing assigned tasks like using a partner Neopet's ability or generating powerups.
Every event has had a reward track where in-app rewards are granted at different milestones. Typically there is a Neopets.com prize that can be claimed separately at 3,000 Bronze Coins. Unique in-app rewards require up to 6,000. Additionally, events have a prize shop that includes a tab for both in-app and another for Neopets.com rewards. So far the Neopets.com rewards have had a shared stock among players, with an additional limit of one per person. Be warned, there has been a lot of competition for the top prize if it is an album item. Even if it doesn't sell out within a minute, there is more demand at the end of the event when more people have Bronze Coins to spend, so make sure to purchase Neopets.com items ASAP. The shop timer is the best way to know when a restock will happen. It rounds down to the nearest day until less than 24 hours remain, and then it will display minutes and seconds. You do not need to restart the app, as it will automatically refresh when the shop restocks. Again, the demand has been high and there is typically a loading screen. TNT has been adjusting the timing and quantity of these restocks, so it's hard to predict how it will be until a new event starts.
Champion Mode
This mode allows you to replay the game, in order, as many times as you like. It's fundamentally the same, except there are no tutorial prompts. There are no new NeoPass rewards simply for replaying, but you can continue to participate in seasonal events to earn prizes or beat levels for normal in-app resources.
The following info is provided in-game:
1. Champion Mode is available once you've completed all available levels.
2. All Event progress, winning streaks, lives, and power-ups will be carried over.
3. Once new levels are available, Champion Mode will be closed and all progress saved.
4. After completing all the new levels, Champion Mode will be available again.
Powerups
Powerups are really what makes the difference between victory and frustration! Most of them are made as you play matches, but you can also obtain them as a resource. The resource variety are called pre-level powerups, and can be obtained through various events, side games, completing story tasks, achievements, etc. If you have played through the side story levels, there are a couple little vending machine type things in the dream world that can distribute up to three per day. One machine is in the dream maze, and the other is on the island. They are also a reward for placing in top 3 within your guild for guild side games.
Powerup Types
Butterfly
Match two by two - Explodes the four surrounding tiles where it's triggered, and targets one objective.
Easy to make and very useful to target straggling or hard to reach objectives. They can also change their target if other matches or powerups.
Missile
Match four in a row - Explodes the row and column where it's triggered.
Second easiest to make and great for lines of objectives. It's best to make these beside a wall of obstacles and swipe into it.
Bomb
Match five in a T or L shape - Explodes the surrounding 5x5 area.
Great for expanding your working area.
Nova Rod
Match five in a row - Clears the most plentiful colored tiles on the board and clears adjacent matches.
Rarest, and most useful when you have a large playing area with lots of Neopets. Can be used to clear obstacles with a lot of "surface area" - like Boxes in a checkered pattern or sporadic Hearts.
Combos
Butterfly+Butterfly
Explodes the eight surrounding tiles where it's triggered, and targets three separate objectives.
Not generally worth setting up on purpose, but might as well use them if they happen by chance!
Butterfly+Missile
Explodes the four surrounding tiles where it's triggered, and targets objectives with a Missile.
Awesome any time there is a row or column of tough objectives.
Butterfly+Bomb
Explodes the four surrounding tiles where it's triggered, and targets objectives with a Bomb.
Usually the only way to maximize a Bomb, and a good way to get a head start on the opposite corner from your working space.
Butterfly+Nova
Transforms the most plentiful colored tiles into Butterflies that each target separate objectives.
This one is easy to understimate, but it is incredibly useful towards the end of a level or against objective that need a lot of matches, like Ukuleles. It's also a "safe" combo, as it will not cause other powerups to explode unless they happen to share a space with a targeted objective like Constellations or Honey. Spawned Butterflies will also clear the space they're on.
Missile+Missile
Clears 3 rows, then 3 columns. (Hits the 3x3 origin area twice.)
Mid range combo that is reasonably easy to make and can help to hit a lot of targets.
Missile+Bomb
Clears 5 rows, then 5 columns. (Hits the 5x5 origin area twice.)
Solid combo for any purpose - clearing the board to charge your Partner's ability, hitting as many objectives at once... enough of these and you'll always be golden.
Missile+Nova
Transforms the most plentiful colored tiles into Missiles.
With enough represenation across the board, this can be a heavy hitter much like Missile+Bomb.
Bomb+Bomb
Explodes the surrounding 9x9 area.
Not a very common combo, but great for Cookies in particular, or clearing a large area of obstacles that are in the final stage.
Bomb+Nova
Transforms the most plentiful colored tiles into Bombs.
Most effective with "surface area", since Bombs can't reach across the board. So they're most effective to get multiple hits on a tough or layered obstacles like high level Boxes or sporadic Hearts over Constellations.
Nova+Nova
Explodes the whole board.
The pièce de résistance of combos... or so you would think! This is a dream any time you have limited space to work with against a blockade of obstacles, especially ones that you just want to get out of the way, like Negg Crates. However, don't pursue it at the expensive of "smaller" combos. It only hits each tile once.
Tip: Sometimes it's better to skip the combo and just trigger one powerup with another. For instance, two Missiles can hit blocky obstacles like Jetsams and Paintings twice, instead of settling for one hit by Missile+Missile. Similarly, two Bombs can break through a barrier faster than Bomb+Bomb.
Starting Powerups
Starting powerups come in two flavors - the Gifts from Neopia, or "streak" powerups, and pre-level powerups that can be timed rewards or that you can select before starting a level. If you maximize both sets, you can start a level with up to six powerups!
Gift from Neopia - Resets when you lose a level, but you can gain up to three if you keep a winning streak. First win adds a Butterfly, second adds a Bomb, and third adds a Nova Rod.
Pre-level Powerups - These can be selected individually, or awarded for x minutes. You cannot turn off timed powerups that have been redeemed. You can use up to any combo of the three - Nova Rod, Missile, and Bomb.
It's easy to waste resources in order to maintain a streak, but the truth is that you can win most levels in a couple tries without them. Harder levels that could use them most are also more likely to make you lose them... but that's just the game! Three levels is not long to recover the streak, so don't fret too much.
Resetting for Combos
A random powerup or two is not going to make or break most levels, but starting with a powerup combo is a powerful boost. Using streak powerups to get a Nova+Bomb combo in the first move is almost always worth it.
To do so, you will most likely need to reset the board until they are in a favorable position. As long as you have not made a move, you can use the button in the bottom right corner to exit the level and try again.
This strategy is most effective on levels with 10-25 starting colored tiles, as it balances a limited playing area (you need to clear space!) with a higher chance to spawn powerups for a combo (resetting can be time-consuming). However, it can't be used on levels where starting powerups don't spawn before the first move.
Tip: Even if you're out of resources and have no starting powerups... you can still try this strategy to get a powerup-making match on the first turn!
Objectives

Make a match next to any Box to remove it.
Basic objective. In general for all objectives, being hit by a match or a powerup causes one damage to progress it to the next stage. Each objective has an animation it must go through before it can be hit again. If animations are basically instanteous, like for Boxes, every hit will count.
Find and collect Constellations under the clouds!
Each Constellation is hidden behind Clouds. You can see parts of the Constellation as you uncover it, and when you clear the Clouds the Constellation spaces will explode. When you find all the Constellations, any remaining Clouds will explode. Constellations have fixed locations, so some levels are designed so the final explosion helps clear other objectives.Check out my Constellation maps in the level guide! Use #s(level number) for quick links.

Match next to a Painting to fill it in.
Goes through stages based on the number of spaces hit, rather than just the number of hits. I.e., one or two for a match 3, two for each Missile, up to four for a Bomb, etc.Match next to an Ukelele to strum! Any adjacent Ukeleles will play too!
These are only seen on Gift levels.Match next to an Ukelele to strum! Any adjacent Ukeleles will play too!
Ukuleles will automatically trigger neighboring Ukuleles. Nova+Butterfly is particularly powerful against them in levels where you need a ton of notes.
Match next to a Letter to reveal a Heart.
Levels are commonly designed so that more of these will fall into the play area when you clear them.Match colours by the Fishing Pond to collect Jetsams of the same colour!
First objective that requires a specific color. Powerups clear Jetsams from the Fishing Ponds in clockwise order - red, yellow, blue, green.
Mmm, Chocolates! Match next to a Chocolate to collect it.
When going from a larger size to a smaller size, the smaller Chocolates will replace random color tiles. The unwrapped final Chocolates explode the four surrounding tiles when cleared. Most powerup combos are not effective at getting Chocolates through multiple stages because of the animation timing and replacement process, so it's best to open large boxes early. Nova+Butterfly is effective at cleaning up any size.
Oh no, the Faeries have been petrified! Free them by using power-ups!
Petrified Faeries are the first objective that require powerups.
Match around the Lawn Roll to unroll it all the way!
Lawn Rolls unpack into 3x3 Grass tiles, but the Grass is only counted once if they overlap. So while this objective can be as high as 999 per level, that number can go down fast. Sometimes a game bug will cause you to lose the level even after getting a green check.
Match around the Wheat Fields to get bundles of Wheat!
Often covers one or two other objectives. If there aren't objectives underneath it, Neopets tiles and even powerups can fall through them or out of sight.Drop the Bottle against the floor to release the Butterfly!
When cleared, these act like a Butterfly powerup, but without the explosion. When Butterfly Boxes are introduced later (451), it is sometimes best to leave them in the Box for a little while if your matching area is small, as the Bottles can get in the way.
Match next any Color Box to remove it.
Same as Boxes but with a color requirement. Sometimes matching Neopets are under the boxes, allowing a cascade of matches.Match next to the Curtains to roll them up.
Usually cover up other objectives, which are not subject to gravity until they're revealed. Missiles, with or without a Butterfly, are really great against them.
Use power-ups to harvest ripe Acorns!
Similar to Hearts, but requires powerups.Match near the Puzzle Packs for puzzle pieces. Collect six to make a complete Puzzle!
A unique objective since you can't use powerups on them directly. Instead, the Puzzle Packs are matched just like Neopets. They can be targeted by Nova Rods or even by powerups added at the start of the level. The Puzzle boards have a long animation to clear, so objectives underneath are almost never affected by simultaneous matching or explosions.
Match around the Fortune Cookies to unwrap Fortune Slips!
There are two versions of the final stage when they break in half - either they will or won't have a visible Fortune Slip inside. You only need to clear ones with a Fortune Slip, so some levels do not require you to clear them all.When the Toy Box hits the bottom, it will release its coloured tiles!
When a Toy Box reaches the board edge, it will open up and randomly distribute pink Unis - either replacing existing colored tiles, or filling up empty spaces. They operate like any other colored Neopet, so if you can open multiple Toy Boxes at once they can automatically make matches and powerups to further clear the board.When the Toy Box hits the bottom, it will release its coloured tiles!
Same as above, except they're white/teal Korbats.Oops! Someone's spilled Honey everywhere! Match or use power-ups to clean it up.
You need to clear at least one Honey tile once per move to prevent it spreading to an adjacent tile, but you have to clear objectives on top of the Honey before you can clear the Honey. Swapping with a Butterfly is an easy way to target a Honey tile that has objectives falling back into place. Note: Honey will also spread when a powerup Item is used, even though these technically don't use a move.
Someone's baking Cookies! Match next to a Cookie to collect it.
Cookies will block Missiles, but Bombs will break right through them!
A unique and challenging objective, since they cut Missiles short, including Missile+Bomb.Cookies will block Missiles, but Bombs will break right through them!
Match colours with the Mystery Bomb to light the fuse!
Cycles through colors in rainbow order: red, yellow, green, blue. Fuses count down the number of colored matches needed to set off the Mystery Bomb, which will explode the whole board. If there are multiple Mystery Bombs, it can be worth triggering the final fuse with separate moves, since they can only target existing tiles.Match around the Negg Crates to make the Neggs sprout!
Bombs are very helpful against these since it is hard to get the corners otherwise. The Negg Crate will not clear until all other animations on the board have stopped.
Break Ice Blocks by matching with the frozen colour!
Matched Neopets (or other items) aren't removable until the Ice Blocks are gone, and do not trigger neighboring objectives. Nova Rod combos do not transform icy Neopets into powerups, but do damage the Ice Blocks. If a match falls onto the board all at once, it can match multiple times until clearing.
Match next to the Gold to mine it!
You can use power-ups to mine Gold as well.
If the Gold is buried, it will require powerups. Only the final stage can be matched adjacent.You can use power-ups to mine Gold as well.
Match next to the Lights to count them down!
Similar to Negg Crates, except you must clear them in the designated order. They don't clear until other animations on the board have stopped. Butterflies cannot clear any Lights that are not lit, but sometimes they will still target them to no effect.Other Modes
Tower Mode
Tier 1
Unlocked after beating level 50. Features random levels from 26 to 50.
Prizes: Two random powerup items and 3,000 Neopoints. The NP reward is not shown in-app.
Tier 2
Unlocked after beating level 150. Features random levels from 52 to 150.
Prizes: 250 Gold Coins and two random powerup items.
Tier 3
Unlocked after beating level 250, and features random levels from 151 to 250.
Prizes: 500 Gold Coins and two random powerup items.
Once a day you can complete a set of 15 levels in Tower Mode (on the main screen, it's the button right above the main level button). The levels are broken up into three tiers of five levels each. While playing Tower Mode, lives are not consumed or needed, and you get rewards for beating each tier. However, losing a level will send you back to the beginning of your current tier.
Tower Levels
Before 6/27/2025, the levels were the same every day. Since then, there is a random set each day, but is is shared among users. They are always played in numerical order. The fastest way to identify each level is based on the quantity of each objective, for which I have keywords in the level guide. For example, searching "16-162-120" will lead to level 90. This isn't a perfect system since there is some overlap, but most combos are unique.
I'm currently listing out Tower levels in my guide neoboard on a daily basis, and I'm keeping a record of them in case a pattern can be discovered. Special thank you to mango_ and satisfunctional for helping me identify daily Tower levels!
Levels 1-25, Gift levels, and (tutorial) levels with only one objective are not included in Tower Mode. It is also possible that level 53 is not included, despite having no obvious reason to be excluded.
Reset and Achievements
While viewing the Tower pathway, there is a countdown indicating when it will reset for the day. Currently it resets at 1:30am NST. There are also some Achievements for beating Tower mode a certain number of times or, effectively, days. The days do not have to be consecutive. The most notable rewards are the exclusive Master of the Tower Stamp for completing 80 days, and the exclusive petpet Lumidrax for completing 100 days.
Events and Quest Log
During seasonal events, Tower levels earn 10 Bronze Coins, and you can use them to complete daily tasks for the in-app event or NeoPass Quest Log. Tower mode is actually really great for NeoPass quests, since they refresh daily so you're never stuck on a hard level. They are a regular source of rewards while presenting occasional challenging levels, so it's easy to use gold coins or powerup items as needed for quests.
Endless Mode
Overview
Introduced on 10/16/2025, the Endless Challenge is a periodic competition that lasts a week at a time. It features a simple rectangular board where you can freely make matches in pursuit of completing certain tasks, or levels, such as destroying tiles of a given color or activating a given powerup within a certain numbr of moves. When you complete a task, you are scored based off the task, number of moves left, and chosen difficulty. Then your moves are reset and you are given a new task, which you may continue doing endlessly. However, if you fail to complete a task within the allotted moves, you lose the attempt and your score up to that point is tallied. When there is an active Endless Challenge, you get one free attempt per day, plus you may buy a second attempt by paying 500 Gold Coins. Note: attempts are spent immediately. If you close the app or lose connection while playing, it will forfeit the attempt. It can be easy to accidentally use attempts during times of app instability, in particular.
Endless Levels
At the beginning of a challenge week, you start at level one in each difficulty mode - easy, medium, and hard - and you can only choose one per attempt. Over the course of the week, you can progress through Endless levels by picking up where you left off in each mode. The gist of it is that easy mode tasks are mostly based on tile colors and hard mode tasks are more often based on powerups. Tasks include destroying a specific color or "any" color; creating a specific powerup (Butterfly, Missile, or Bomb), or "any" powerup (this category includes Novas); or activating a specific powerup or "any" powerup.
Tasks - Hard Mode
Tasks are assigned randomly. Every 5th level has a harder variant, requiring you to destroy/create/activate more tiles in fewer moves. The first 30 levels are also easier before they become predictable according to the list below. After that, the easy variant must be done in 18 moves, while the harder variant must be done in 16 moves.
Example: Type of task - base score:move multiplier - easy quantity/hard quantity
Destroy any color tile - 10:2 - 58/70
Destroy Red/Yellow/Green/Blue/Pink tiles - 20:4 - 48/55
Create any special tiles - 25:5 - 14/16
Create Butterfly tiles - 30:6 - 8/9
Activate any special tiles - 40:8 - 8/10
Create Missile tiles - 40:8 - 7/9
Activate Butterfly tiles - 45:9 - 6/8
Create Bomb tiles - 50:10 - 6/8
Activate Missile tiles - 60:12 - 5/7
Activate Bomb tiles - 75:15 - 5/7
In-App Rewards
During the course of the challenge, you can view the leaderboard and see where your score places you. The top 20 players are shown, but in-app rewards are granted for up to 8,000 players.
1st: (Mega Wand, Mini Wand, Magic Glove) x6, 60m lives, 8,000 Gold Coins
2nd: (Mega Wand, Mini Wand) x5, 30m lives, 6,000 Gold Coins
3rd: (Mini Wand, Magic Glove) x4, 15m lives, 5,000 Gold Coins
4-10: (Mega Wand, Mini Wand) x3, 4,000 Gold Coins
11-20: (Mega Wand, Mini Wand) x2, 3,000 Gold Coins
21-50: (Bomb, Nova) x5, 3,000 Gold Coins
51-100: (Bomb, Nova) x3, 2,000 Gold Coins
101-200: (Bomb, Missile) x3, 2,000 Gold Coins
201-500: Missile x3, 1,500 Gold Coins
501-1000: Missile x2, 1,000 Gold Coins
1001-3000: Missile x1, 500 Gold Coins
3001-8000: Missile x1
After the challenge is over, there's a period of time where participants may claim their rewards - so far it seems like we can expect a one week on, one week off schedule, but the first reward period was longer.
2nd: (Mega Wand, Mini Wand) x5, 30m lives, 6,000 Gold Coins
3rd: (Mini Wand, Magic Glove) x4, 15m lives, 5,000 Gold Coins
4-10: (Mega Wand, Mini Wand) x3, 4,000 Gold Coins
11-20: (Mega Wand, Mini Wand) x2, 3,000 Gold Coins
21-50: (Bomb, Nova) x5, 3,000 Gold Coins
51-100: (Bomb, Nova) x3, 2,000 Gold Coins
101-200: (Bomb, Missile) x3, 2,000 Gold Coins
201-500: Missile x3, 1,500 Gold Coins
501-1000: Missile x2, 1,000 Gold Coins
1001-3000: Missile x1, 500 Gold Coins
3001-8000: Missile x1
Endless does not grant typical level rewards, like Closet Tokens or Bronze Coins.
Achievements
Several achievements were added in relation to Endless mode on 12/17/2025. Of particular note are five achievements requiring each of the available Neopet Partners in hard mode. These are permanent achievements, and much like other game achievements will not require consecutive play, so players can go at their own pace. In order to claim each stamp, players will need to activate the max ability of a given Neopet Partner 150 times while playing hard Endless mode. How fast this can be done will depend entirely on a player's strategy and their use of in-app resources to prolong Endless attempts. Theoretically, one achievement could be completed per Endless attempt, but it would be more realistic to take several attempts per stamp.
Varia Stamp - Varia is the default Neopet Partner available at the start of the game. She has the Bomb ability, which is charged with red tiles.
Tia Stamp - Tia is available through the main story, by spending Wocky Jelly. She has the Windmill ability, which is charged with green tiles.
Jorett Stamp - Jorett is available through the main story, by spending Wocky Jelly. He has the Boomerang ability, which is charged with yellow tiles.
Nephrite Stamp - Nephrite is available through the main story, by spending Wocky Jelly. They have the Bomb ability, which is charged with red tiles.
Ascor Stamp - Ascor is available by collecting 20 Fragments through monthly events' reward tracks and in-app prize shops. He has the Boomerang ability, which is charged with yellow tiles.
Note: if you have progressed through the story and are still unable to unlock a Neopet Partner, send a ticket to support. They have been known to grant Partners through the notifications system.
Tia Stamp - Tia is available through the main story, by spending Wocky Jelly. She has the Windmill ability, which is charged with green tiles.
Jorett Stamp - Jorett is available through the main story, by spending Wocky Jelly. He has the Boomerang ability, which is charged with yellow tiles.
Nephrite Stamp - Nephrite is available through the main story, by spending Wocky Jelly. They have the Bomb ability, which is charged with red tiles.
Ascor Stamp - Ascor is available by collecting 20 Fragments through monthly events' reward tracks and in-app prize shops. He has the Boomerang ability, which is charged with yellow tiles.
Note
So far Endless mode has only occurred a few times, and I have noticed a few tweaks since it was launched. For instance, hard mode seemed very punishing during the first challenge, and overly easy during the second challenge. Two recent challenges, from 12/11 to 12/17 and 12/25 to 12/31, coincided with a non-integrated promotion featuring Neopets.com prizes. Champion (neodeck card) for the top 20 players, Gifts for your Enemies for 21-50, and Fiery Battle Duck for 51-100. These rewards are scheduled to be awarded "within 4 weeks" of January 1st.
Difficulty Ranking
Ranking
☆☆☆☆☆ - All but guaranteed to win!
★☆☆☆☆ - Most likely a win.
★★☆☆☆ - Borderline chance of winning or losing.
★★★☆☆ - Moderately challenging. You'll need some luck.
★★★★☆ - Requires extra luck or some resources.
★★★★★ - Save resources for levels like this.
Some rankings include one or more ✯ symbol, which indicate that there is a noticeable difference when using ideal starting powerups - typically a Nova+Bomb combo in the first move - versus no starting powerups at all.
The difficulty ranking system is based on 4 runs as of 1/6/2026, plus numerous days of Tower mode.
Method
The official Green/Purple/Red designations of the levels can feel quite inaccurate a lot of the time. In order to gauge how truly difficult levels are, I track multiple types of data and restrict my use of resources. My goal, especially, is to validate the difficulty for free to play users.
Tracked Data
Number of attempts
Number of close attempts - Roughly defined as an attempt where I could have guaranteed a win if I used coins or one or two powerup items.
How lucky the winning match felt - Entirely subjective, but heavily informed by my experience in past runs.
Moves left after winning
General Restrictions
No coins to buy moves
No powerup items
No pre-level powerups
My findings have been that while luck is a major factor in any attempt, any level can be beaten without expending resources! There are some that are well worth using resources on to save time, but thankfully most resources are renewable even if you're stuck on a main level.
Run 1 - Challenge
When - March/April 2025
Number of attempts - 1,857, which equates to 1,157 lost lives!
Close attempts - 24.5%
Winning luck - neutral 32%, lucky 47%, very lucky 20%, unlucky 1%.
Gift level coins - 12,267
Notes
Powerup items - I did use Magic Glove once to make up for a move that misaligned a powerup combo.
Pre-level powerups - I only used these for the one level I couldn't beat otherwise - level 605!
Gifts From Neopia - I intentionally broke my streak in order to avoid having an advantage. I generally didn't reset for Butterflies alone. If I kept Bombs or Novas, I attempted to account for that in my data.
Most Tries
605 - 101 tries, 5% close
677 - 56 tries, 13% close
699 - 56 tries, 14% close
585 - 42 tries, 10% close
405 - 35 tries, 29% close
687 - 35 tries, 29% close
229 - 31 tries, 19% close
355 - 27 tries, 19% close
295 - 24 tries, 21% close
625 - 22 tries, 23% close
Game Progression
Levels 1-100 - 9 losses
Levels 101-200 - 42 losses, 12% close
Levels 201-300 - 159 losses, 33% close
Levels 301-400 - 168 losses, 29% close
Levels 401-500 - 133 losses, 32% close
Levels 501-600 - 188 losses, 27% close
Levels 601-700 - 458 losses, 19% close
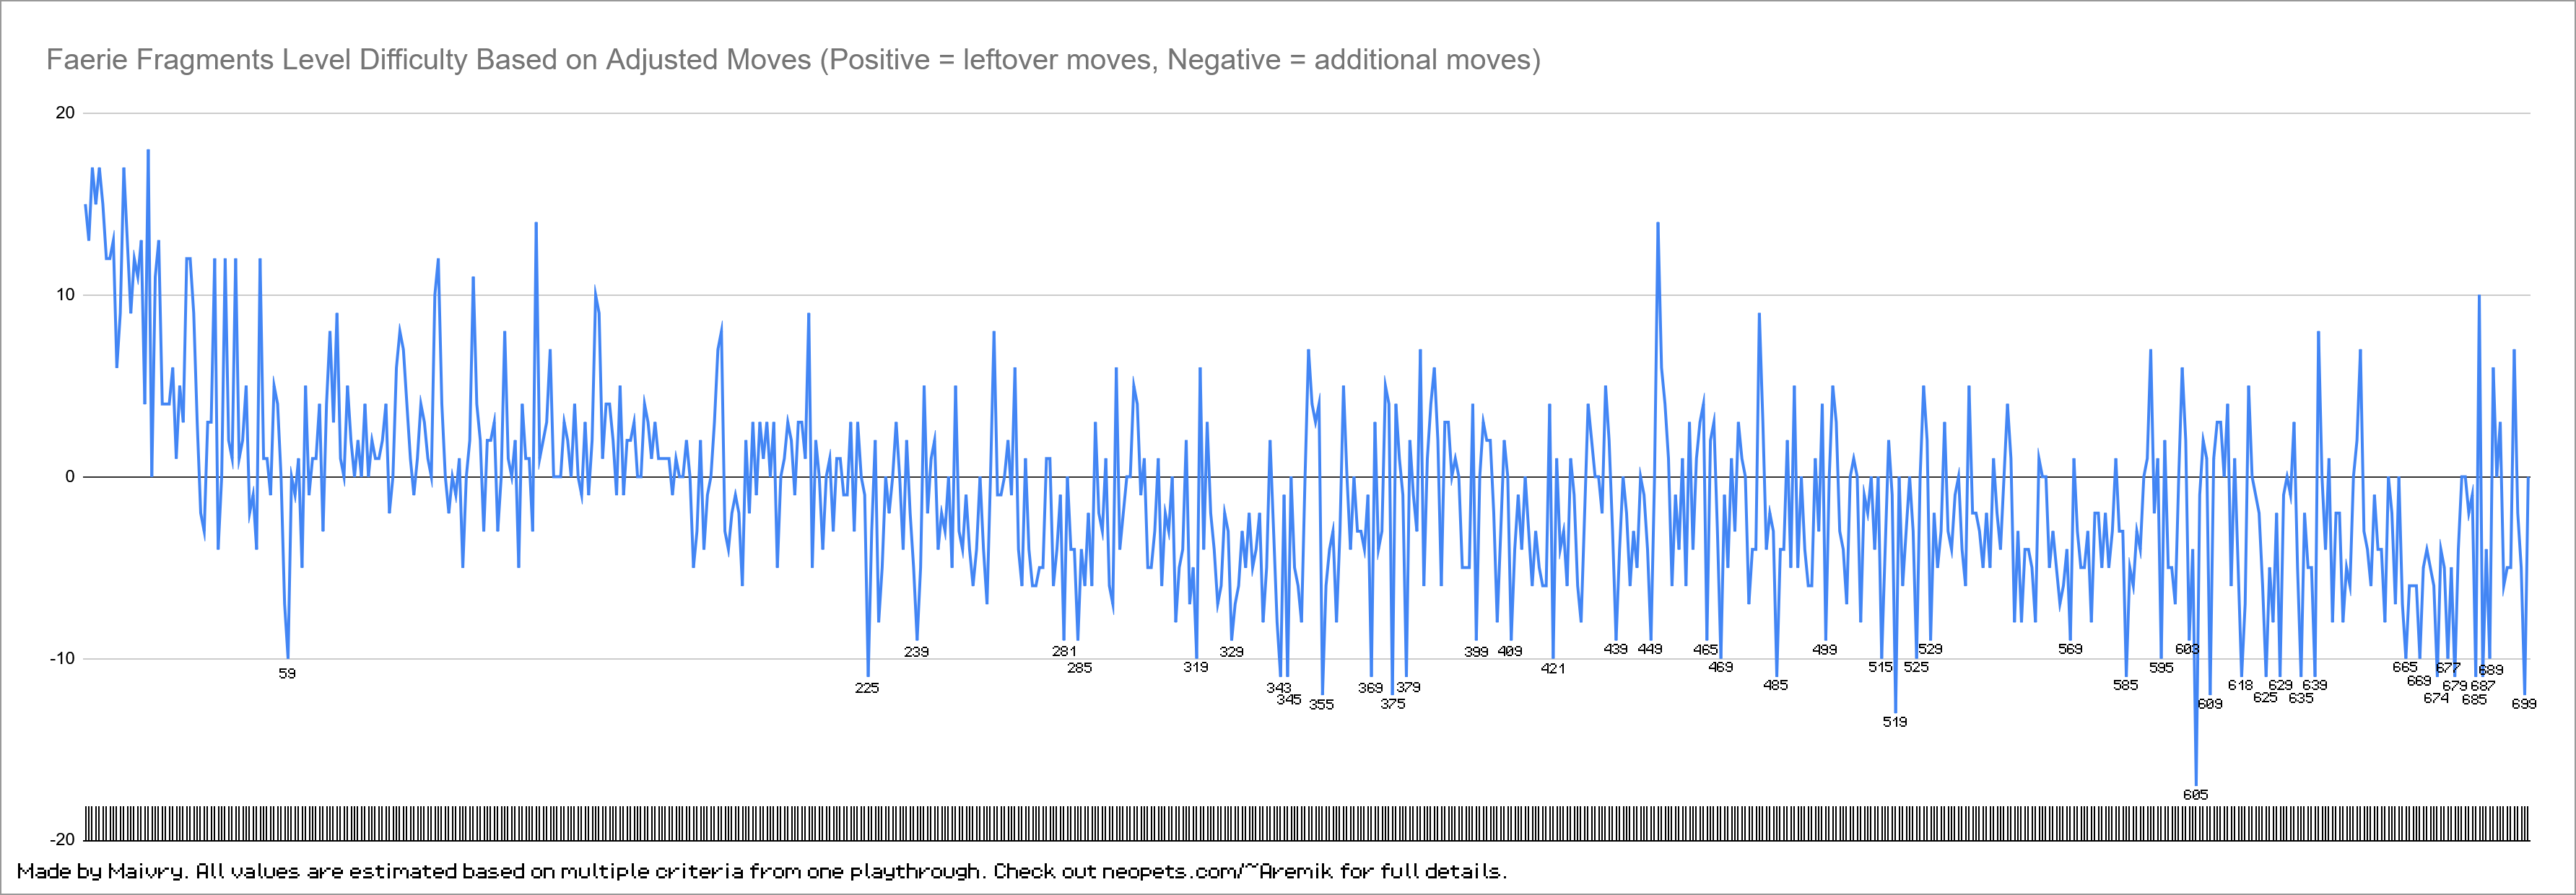
Interpretation
The graph above shows adjusted moves, with the idea to represent exactly how many moves would be required to make all levels equally difficult with neutral luck. If I felt the win was very lucky, I subtracted 10 moves. If only lucky, I subtracted 5 moves. There were a few levels I managed to beat that felt unlucky, so I added 5 moves to those.
The other major adjustment was based on the number of tries vs. close losses. Translating this to moves is... difficult at best. Levels where I won or came close at least 75% of the time got no adjustment. Some levels I passed with a very lucky match within a few tries, so I didn't want to give too much weight to ones where I wasn't so lucky up front. Most of the time I only subtracted one or two moves for harder levels. I did adjust level 605 by 7 moves, since I only came close to winning 5% of the time. Until further notice, I think I have plenty of reason to believe that is the hardest level with no bonus powerups!
Run 2 - Streak Combos
When - April/May 2025
Number of attempts - 1,247, which equates to 547 lost lives!
Close attempts - 30%
Winning luck - neutral 45.5%, lucky 42.5%, very lucky 10%, unlucky 2%.
Gift level coins - 12,824
Notes
Gifts From Neopia - This time I kept my streak going and reset the starting positions of the powerups until I had an ideal combo. For most levels, that was Nova+Bomb.
Resetting - This is actually where I learned to reset for starting combos. It made a significant difference over the run without starting powerups.
Most Tries
229 - 49 tries, 29% close
369 - 29 tries, 34% close
489 - 24 tries, 13% close
699 - 22 tries, 14% close
605 - 19 tries, 11% close
665 - 15 tries, 20% close
677 - 15 tries, 13% close
469 - 10 tries, 20% close
619 - 10 tries, 20% close
625 - 10 tries, 10% close
Game Progression
Levels 1-100 - 10 losses, 40% close
Levels 101-200 - 24 losses, 71% close
Levels 201-300 - 98 losses, 31% close
Levels 301-400 - 83 losses, 31% close
Levels 401-500 - 85 losses, 21% close
Levels 501-600 - 83 losses, 36% close
Levels 601-700 - 164 losses, 25% close
Run 3 - Challenge
When - May/June/July 2025
Number of attempts - 1,678, which equates to 978 lost lives!
Close attempts - 27%
Winning luck - neutral 37%, lucky 46%, very lucky 16%, unlucky 1%.
Gift level coins - 11,588
Notes
Gifts From Neopia - Once again I intentionally broke my streak so I didn't start with any powerups, except sometimes a Butterfly.
Resetting - On some hard levels, I reset so that I could form a powerup in the first move.
Most Tries
465 - 123 tries, 9% close
605 - 65 tries, 9% close
375 - 37 tries, 16% close
665 - 37 tries, 27% close
355 - 34 tries, 18% close
699 - 30 tries, 13% close
575 - 27 tries, 26% close
687 - 26 tries, 31% close
369 - 24 tries, 33% close
629 - 23 tries, 35% close
Game Progression
Levels 1-100 - 16 losses, 56% close
Levels 101-200 - 30 losses, 53% close
Levels 201-300 - 110 losses, 36% close
Levels 301-400 - 172 losses, 25% close
Levels 401-500 - 210 losses, 20% close
Levels 501-600 - 139 losses, 29% close
Levels 601-700 - 301 losses, 26% close
This run was comparable to data run 1, but I lost 15% fewer lives, and had many more close attempts. Evidently I keep learning better strategies. :)
Two levels did push me to my limit, however: after 100 tries, I started using pre-level powerups for level 465. I used a Missile+Bomb combo in the first move of the winning match. Similarly, I had attempted level 605 over 100 times in the first challenge run, and thus allowed myself to buy moves when I had a lucky enough match.
Run 4 - Streak Combos
When - Sept through Dec 2025
Number of attempts - 1,209, which equates to 509 lost lives!
Close attempts - 31%
Winning luck - neutral 54%, lucky 35%, very lucky 10%, unlucky 1%.
Gift level coins - 12,183
Notes
Gifts From Neopia - I kept my streak going and reset the starting positions of the powerups until I had an ideal combo. For most levels, that was Nova+Bomb.
This run was comparable to data run 2, with slight improvements on both losses and close attempts. In fact, it was looking a LOT better until I got to the 600s, haha. (More proof that 605 is the hardest level, right?)
Most Tries
605 - 101 tries, 12% close
589 - 23 tries, 27% close
685 - 21 tries, 20% close
669 - 20 tries, 32% close
625 - 16 tries, 13% close
399 - 14 tries, 23% close
489 - 14 tries, 31% close
246 - 12 tries, 27% close
469 - 12 tries, 45% close
465 - 11 tries, 0% close
Game Progression
Levels 1-100 - 10 losses, 50% close
Levels 101-200 - 17 losses, 47% close
Levels 201-300 - 60 losses, 37% close
Levels 301-400 - 64 losses, 36% close
Levels 401-500 - 70 losses, 39% close
Levels 501-600 - 62 losses, 42% close
Levels 601-700 - 226 losses, 21% close
Troubleshooting
Unfortunately, Faerie Fragments is well known for bugs and connection issues. If you're having trouble, you're probably not alone.
A quick note on how the game saves progress: during match 3 levels, the game is effectively offline and will not save progress until you pass the level and see the rewards screen, or fail the level and accept defeat. Endless Mode, however, saves both before and after playing. That is, if you start the level it will use your ticket immediately, but won't save your score unless you lose or quit via the bottom right corner menu.
Device Issues
Android - Most of the time the game works as well as one can expect on Android devices. This means that it hardly ever crashes, but soft locks (such as the user interface disappearing) are still known to happen. Recently some devices are getting phased out, but it's not entirely clear what is incompatible.
iOS - Historically, iOS users have been long-suffering trying to get the game to work for any amount of time without crashing, particularly iPad users. As of the 7/24 update, users have reported much improved stability!
PC: Android emulators - With the right settings, emulators fare almost as well as genuine Android devices. However, with default settings they're prone to getting stuck on loading screens or crashing. Here's a quick rundown of settings that I've been able to confirm work, using BlueStacks:
1. Use the Virtualization option. If this is not a default setting for your PC, you will have to find instructions specific to your CPU to confirm whether it's supported and to enable it.
2. Use the Multi-Instance Manager to create a fresh instance with the correct settings. Namely, choose Android 11 for the version and ARM for the ABI settings (avoid x86). Neither of these settings can be changed once the instance is created, but you can check what ABI settings are in use by launching the emulation and checking Settings - Advanced. Other settings besides the default might work, such as the beta for Android 13, but I haven't tested them.
Note: There seems to be a special bug on emulators. Upon launching the game after completing at least the first task of the story, it will pop-up certain screens once per day. Namely, the Announcements pop-up can soft lock the game on the town screen without UI. A temporary solution is to reboot the app and tap a UI button (such as the button to play a match 3 level) the moment it appears. This will bypass the pop-ups, and you can play normally and safely go back to the town screen. However, manually going to the Announcements screen will cause the same soft lock.
Connection Errors
There are a few different versions of these ("Connection Lost", "Cannot settle match", "Cannot sync data", etc.) but the effects are generally the same: you'll need to press "Retry" or the x in the corner of the pop-up to hopefully reconnect.
Most likely, it will not reconnect on the first try, so pressing Retry/x repeatedly and in quick succession is often necessary. If it's not cooperating, I will also try minimizing the app and maximizing it again, and tapping outside of the pop-up area. If the pop-up disappears and "Retrying..." appears at the bottom of the screen, that can be a good sign. Let it think and try again if necessary.
If these tactics do not resolve the connection error, then the game is soft locked and a restart is necessary. Nowadays that only happens to me rarely.
These errors will pop up if you have a genuine connection issue, but most of the time it's an issue with the official servers that affects all users. Unfortunately, they usually don't occur until after a level has been completed but before it has been saved, because it effectively lets you play offline during the course of a level.
Recently, some users have been experiencing "permanent" connection errors - that is, they can play the same main story level over and over again, but it will never save their progress. Some of these users have reported becoming unstuck by progressing in other areas of the games (the story, side levels, etc.) or by intentionally losing the level.
There is a similar error where the only option is to press "Restart." It often appears after completing a level in Tower mode, and otherwise I have only seen it in menu screens, rather than after main levels. Sometimes it does save Tower level progress, but it's not clear if there's a way to encourage this. I often find that it gets stuck on a loading screen after restarting, so I usually just close the app and try again.
Gameplay Bugs
-Levels with Lawn Rolls/Grass may cause level failure even though the objective appears complete.
-Any time there is not enough space or enough tiles of the same color to be able to form a match even after reshuffling, the game will forfeit the level. This is a particular problem on level 595, but is also possible on levels like level 167 if the default Missiles do not remove the Paintings. (In that case, make sure not to swipe a solo Missile off to the side!)
-In general, matches and powerup formation can behave unpredictably if tiles are falling into place, as there is a mismatch between the visuals and the programming. However, even when tiles are not in motion, swiping a powerup and making a match at the same time can interfere with the normal matching process. Ex: swiping a Butterfly while making a correctly colored match next to a Fishing Pond will set off the Butterfly, but not clear the corresponding Jetsam with the color match.
-While Butterflies are generally pretty smart about targeting objectives, they have trouble with certain late game ones. For example, they may target already Bottles in Butterfly Boxes that are already activated or Lights that are not lit yet.
-Closing the app after finishing level 699 but before finishing level 700 can skip level 700 and revert back to level 1. This might only be the case for level 699 in Champion mode.
-Starting a game of Match Dash with a level goal that wraps around from level 700 to level 1 can make it get stuck on level 700.
-Side Games, such as Match Dash or Airship Expedition, seem to be prone to widespread issues periodically where they do not track or give rewards properly. Sometimes they get stuck in a finished state. They have a tendency to disappear from the rotation as a result. Hungry Meepits and Rainbow Fountain are both side games that have not been seen for a while, even though Rainbow Fountain did not have bugs that I know of.
Misc Bugs
-Some users have reported issues with the payment system where they will not receive the purchased resources, and the payment may still process. If this applies to you, definitely contact support. Unfortunately multiple people are having little or no progress with this issue, so if you want to make a purchase I recommend testing functionality with a small purchase first in case it affects you. It might be limited to iOS users, although it is not a problem with the Apple Store itself.
-There are a few different NeoPass login errors. Some steps to try: 1. Restart the app. 2. Try temporarily disabling two-factor authentication in the NeoPass portal and manually typing your credentials. 3. Some issues might be browser-based, such as captcha errors. Since the app launches the browser, you will need to change the default browser on your device in order to prompt it to open a different browser.
-One iOS user reported a solution to an ongoing login issue - while they used Chrome as their default browser, Safari had a setting enabled that blocked cookies in all browsers. This setting could be found under Safari's advanced settings.
-Sometimes Partner Neopets are not unlocked when they are supposed to be. (Check the Story Overview section of Jellyneo's guide for the correct timeline.) Contact support to fix this - they can send missing Partners through Notices, oddly enough.
Small Bugs
-Notifications say they will expire after 30 days, but the expiration timer only lasts for two weeks. Go by the timer in every case.
-The button to help a guild member may appear grayed out after helping another guild member, even if you have not helped them yet. Any other interaction will refresh it and make it interactive again.
-During Bronze Coin events, it is possible for high demand items in the Neopets.com side of the prize shop to sell out within a minute and grant more than the allotted stock in the process. As a result, it will display a negative number in stock, but the - sign is on a different line from the number.
-A side game called Faerie Dailies sometimes appears after 5pm NST, which is when side games refresh, but is empty of content and cannot be interacted with.
-Cosmetic items may or may not appear in every Partner Neopets' closet, and purchasing them may or may not apply to every Partner.
I am no doubt missing a number of issues, particularly for areas of the game that I completed a long time ago (like the story tasks or side story levels), but feel free to let me know about any ongoing issues. Remember that sending tickets is an important way to give feedback to the devs. If it's a major issue and affects multiple users, I recommend escalating the issue to an ambassador. While there is no dedicated mobile apps ambassador, I'm told most of them do play the apps and are qualified to pass info along.
Page Log

12/19/2025 - Added Endless Mode section.
8/16/2025 - Added level notes to every 5 star level. Added Troubleshooting section.
7/15/2025 - Added direction of wind.
6/28/2025 - Revised Tower Mode section and level info.
6/2/2025 - Added Powerups and Tower Mode sections. Revised Gameplay and Objectives sections.
4/29/2025 - Added board dimensions and finished adding Constellation maps.
4/9/2025 - Added difficulty rankings and Sample Level 0.
4/4/2025 - Added Constellation maps for levels 310-498.
3/31/2025 - Added Constellation maps for levels 499-700.
3/28/2025 - Overhauled the level screenshots and fixed some level info goofs.
3/27/2025 - Added more navigation.
3/4/2025 - Refined some of the tips and filled in some missing level info.
3/1/2025 - Added Neopet colors to level info.
2/28/2025 - Added images of objectives with multiple stages.
2/26/2025 - Added difficulty color coding.
2/25/2025 - Added Objectives and Share sections, and made visual improvements.
2/23/2025 - Added level objective summaries.
2/22/2025 - Added more tips and tidied up code.
2/18/2025 - Page created.
Neomail Maivry for comments, corrections, and suggestions!